 Windows x64 ShellCode入门教程 01
# Windows x64 ShellCode入门教程 01
必须承认,我在互联网上四处搜寻x64基础 shellcode 开发的示例,但收获不大。许多教程和课程似乎仍侧重于x86汇编,甚至许多现代的shellcode课程也仍以x86为主。别误会,x86很棒,学习曲线也没那么陡峭。但在你的渗透测试之旅中,大多数有效载荷将基于x64架构,这是有区别的!我希望提供一系列循序渐进的课程,帮助读者你获得必要的资源和知识,以便顺利学习x64汇编/shellcode开发,尽量少走弯路。那么,我们开始吧,好吗?
声明 - 说到x64汇编语言,我可不是专家。但我所掌握的知识,至少足以指导那些有兴趣的人学习基础知识,并生成可用于漏洞利用开发、逆向工程概念和渗透测试项目的可用shellcode。
最后,NASM(The Netwide Assembler)汇编语法将作为我们x64汇编编码需求的首选语法。让我们开始吧!🐱
# 第1部分 - x64 基础知识:寄存器
好的,让我们先把那些枯燥但至关重要的信息讲清楚。在x64汇编中,有两种类型的寄存器值:
- 易失性(Volatile)寄存器:适用于寄存器RAX、RCX、RDX、R8、R9、R10、R11
- 非易失性(Non-Volatile)寄存器:RBX、RBP、RDI、RSI、R12、R13、R14、R15、RSP
Volatile寄存器正如其名,会根据函数调用等情况改变值。
Non-Volatile寄存器在函数调用后不会改变值,并且可以可靠地用于存储你的代码中需要的数值。
寄存器 RCX、RDX、R8 和 R9 按此确切顺序用作参数。例如,当你执行 ExitProcess 并将第一个参数 0 传递给函数调用时,你会使用寄存器 RCX,如下所示:
; void ExitProcess(UINT uExitCode);
mov r15, rax ;address for ExitProcess previously acquired
mov rcx, 0   ;move '0' into the first and only expected parameter
call r15     ;Execute ExitProcess!!!
2
3
4
如果有多个参数怎么办呢?嗯,那会将RCX用作第一个参数,RDX用作第二个参数。如果你还有第三个和第四个参数值,那么将分别使用r8和r9。以下是WinExec的x64汇编代码,将应用程序字符串传入RCX,将值“1”传入RDX。如果应用程序有窗口/图形用户界面要显示,1就相当于“显示窗口”。
; UINT WinExec(LPCSTR lpCmdLine, UINT uCmdShow);
pop r15                         ;address for WinExec previously acquired
mov rax, 0x00                   ;NULL byte
push rax                        ;push to stack
mov rax, 0x6578652E636C6163     ;calc.exe
push rax                        ;push to stack
mov rcx, rsp	                ; RCX, our first parameter, now points to the string of the application we wish to execute: "calc.exe"
mov rdx, 1                      ; move 1 into RDX as the 2nd parameter to display the application's GUI/window
sub rsp, 0x30                   ; I'll explain this in greater detail later.  It involves shadow space/16 byte stack alignment
call r15                        ; Execute WinExec!!!
2
3
4
5
6
7
8
9
10
四个参数都用上怎么样?我们可以用MessageBoxA来演示一下:
; int MessageBoxA(HWND hWnd, LPCSTR lpText, LPCSTR lpCaption, UINT uType);
mov r15, rax                   ; MessageBoxA address previously acquired
mov rcx, 0                     ; 1st Parameter - hWnd = NULL (no owner window)
mov rax, 0x006D                ; move the final letter, m, into RAX and null terminate with a '0'
push rax                       ; push 'm' and 0 to the stack, pointed to by RAX
mov rax, 0x3374737973743367    ; move the first 8 characters of the string 'g3tsyst3' into RAX.
push rax                       ; push 'g3tsyst3' string to the stack, pointed to by RAX
mov rdx, rsp                   ; 2nd Parameter - lpText = pointer to message

mov r8, rsp                    ; 3rd Parameter - lpCaption = pointer to title
mov r9d, 0                     ; 4th Parameter - uType = MB_OK (OK button only)

sub rsp, 0x30                  ;I'll explain this in greater detail later.  It involves shadow space/16 byte stack alignment
call r15                       ; Call MessageBoxA
2
3
4
5
6
7
8
9
10
11
12
13
14
请注意我是如何使用寄存器 R15 来存储API的地址值的。我选择这个寄存器是因为和它的其他同类寄存器R14、R13和R12一样,它是非易失性的,这意味着在函数调用后它不会被改变。当你需要保留一个尚未压入堆栈的值时,这些非易失性寄存器至关重要。这里有一个函数调用前后寄存器值的示例。请注意,所有易失性寄存器的值都如预期般发生了变化,但R15保持不变。
调用前:

函数调用结束后:

好的!以上就是对x64寄存器的大致解析。接下来继续!
# 第1部分 - x64基础知识:栈对齐
我保证,枯燥的内容就快讲完了。有趣的部分马上就来。😺 好啦,继续往下讲。咱们来聊聊 16 byte stack alignment convention。如果你觉得这听起来像天书,别担心,虽然实现起来有点繁琐,但相当简单明了。我会尽可能简单地讲解。
在x64汇编中,栈以16字节边界运行。在进行函数调用之前,栈需要根据这一原则进行对齐。
简单来说,在进行函数调用之前,RSP必须能被16整除。
不必只关注16字节对齐时RSP的具体值,你可以将此要求理解为栈指针(RSP)需要位于任何能被16整除的地址上(即0x10、0x20、0x30等)。这意味着,任何使得RSP % 16 == 0的 RSP 值都被视为是对齐的。
整除示例:
PUSH和CALL是会使栈指针递减8字节的指令示例。POP会使栈指针递增8字节。这将改变栈对齐方式。例如:

执行POP指令之前,RSP的十位数值是0x88,即十进制的136。这个数不能被16整除(136/16 = 8.5)。 然而…
在执行POP指令后(该指令会使RSP增加8字节),栈又恢复到了16字节对齐的状态。

现在,RSP的十位保存着十六进制值0x90,十进制为144,且能被16整除(144/16 = 9)!仔细想想,这本质上非常数学化。不管你喜欢还是讨厌,这都是x64汇编的一部分,但它并不像看上去那么痛苦。在整个代码过程中,最好让堆栈保持对齐状态,不过在函数调用之前保持对齐尤为重要。如果堆栈没有正确对齐,你的代码很可能会跳转到内存中意想不到的位置并导致失败。
# 第1部分 - x64 基础:影子空间(Shadow Space)
好的,希望你还能坚持读到这里,而且目前为止一切都能理解。如果还有什么不太明白的地方,可以给我发私信。好了,我保证我们马上就要讲完这篇文章x64基础部分啦!🐶 现在我们来谈谈Shadow Space,也叫home space / 或叫spill space。
在Windows x64调用约定中,调用方需要为被调用方预留32字节(4个8字节的槽位)作为shadow space,即使函数并不需要它。这个空间是预留的,但不会自动调整,除非使用诸如sub rsp, 0x20或其他指令显式处理。
函数经常需要额外的栈空间来存放局部变量并进行进一步对齐。你可能会看到sub rsp, 0x30,甚至像sub rsp, 0x40这样更大的调整,以便在函数调用前分配影子空间和额外空间。我在自己的代码中经常这样做。再次强调,这有助于确保当函数需要将预期值以及可能的非预期值压入栈中时,有足够的空间,并且有助于确保RSP始终保持16字节对齐。这里有一个示意图,能帮助你更好地理解这一点。
首先,我将注释掉函数调用前的影子空间分配,看看会发生什么:
GetProcAddress(hKernel32, "LoadLibraryA");

然后编译它(我喜欢用ld.exe来编译我的x64汇编代码):
>nasm -fwin64 getproc.asm
>ld -m i386pep -o getproc.exe getproc.obj
2
RCX存放着kernel32的基地址,RDX存放着指向我们的"LoadLibraryA"字符串的指针,而 R15存放着GetProcAddress的地址:

如果我们在函数调用前完全忽略设置任何影子空间,似乎通常会放入RAX的返回值就无法正常工作。如果函数调用后RAX为0,这通常不是好事。我们放在栈上的参数和其他数据,在没有我们应该提供给函数的正常预留空间的情况下,很可能被破坏了。看看这个:
函数调用前:

函数调用后:

好吧,这证明了如果不设置适当的影子空间储备,事情会变得多么糟糕。我们现在就这么做,看看情况会不会对我们更有利:😸
现在,我们将添加影子空间,在同一位置重新编译和反汇编程序,看看会发生什么:

中啦! 就在这儿,如我们所愿找到了LoadLibraryA这个Windows API的地址。 就在那里,在RAX寄存器中热切地等待着我们。 你还会看到我们对影子空间堆栈的调整:

我可以不断地讲述减轻潜在影子空间问题的方法。但这会让你很好地了解预期情况,以及如何为使用x64 16字节堆栈对齐和影子空间要求的函数调用做准备。既然我们已经对x64汇编的寄存器和堆栈对齐要求有了一个很好的概述,那么让我们深入到这篇文章的下一部分。
# 第2部分 - x64首个程序:动态定位WinExec并执行calc.exe
在处理完所有必要的乏味事务后,我们终于要开始做令人兴奋的事了。
好的,我将基于这样一个假设,即你已经熟悉了一些常规的x64指令。如果还不熟悉,也不用担心!我会添加注释,以帮助解释你应该熟悉的最常见指令,并帮助你理解它们的工作原理。此外,我还假设你知道定位kernel32基地址以及遍历PE文件(可执行文件)的导出表以查找函数/API名称的序号的基本模板是什么。如果有机会,我建议你熟悉一下PE导出表,但目前你可以直接在我的模板基础上进行操作。
让我们从定位kernel32基地址开始。这实际上非常简单!
;nasm -fwin64 [x64findkernel32.asm]
;ld -m i386pep -o x64findkernel32.exe x64findkernel32.obj

BITS 64
SECTION .text
global main
main:

sub rsp, 0x28
and rsp, 0xFFFFFFFFFFFFFFF0
xor rcx, rcx             ;RCX = 0
mov rax, [gs:rcx + 0x60] ;RAX = PEB
mov rax, [rax + 0x18]    ;RAX = PEB / Ldr
mov rsi,[rax+0x10]       ;PEB_Ldr / InLoadOrderModuleList
mov rsi, [rsi]           ;could substitute lodsq here instead if you like
mov rsi,[rsi]            ;also could substitute lodsq here too
mov rbx, [rsi+0x30]      ;kernel32.dll base address
mov r8, rbx              ;mov kernel32.dll base addr into register of your choosing
2
3
4
5
6
7
8
9
10
11
12
13
14
15
16
17
18
好的,kernel32 base address 现在存于 r8 中。r8 是一个 易失性 寄存器,所以如果你需要多次使用这个寄存器,一定要将该寄存器保存的值转移到另一个寄存器中,因为在你第一次调用函数后,该值几乎肯定会被覆盖。我们来测试一下,看看是否能获取到kernel32基地址。果然,它就在 RBX 中,并且也在我们复制到的 R8 中:

既然我们已经获取了kernel32的基地址,那我们接着获取函数总数以及相对虚拟地址(RVA)/虚拟内存地址(VMA)的信息:
;Code for parsing Export Address Table
mov ebx, [rbx+0x3C]           ; Get Kernel32 PE Signature (0x3C) into EBX
add rbx, r8                   ; signature offset
mov edx, [rbx+0x88]           ; PE32 Signature / Export Address Table
add rdx, r8                   ; kernel32.dll + RVA ExportTable = ExportTable Address
mov r10d, [rdx+0x14]          ; Total count for number of functions
xor r11, r11                  ; clear R11
mov r11d, [rdx+0x20]          ; AddressOfNames = RVA
add r11, r8                   ; AddressOfNames = VMA
2
3
4
5
6
7
8
9
接下来,让我们插入我们要查找的函数名,并设置函数计数器:
mov rcx, r10                  ; Setup loop counter

mov rax, 0x00636578456E6957   ;"WinExec" string NULL terminated with a '0'
push rax                      ;push to the stack
mov rax, rsp	              ;move stack pointer to our WinExec string into RAX
add rsp, 8                    ;keep with 16 byte stack alignment
2
3
4
5
6
现在,让我们找出 WinExec 函数:
; Loop over Export Address Table to find WinApi names
kernel32findfunction:
    jecxz FunctionNameNotFound    ; If ecx is zero (function not found), set breakpoint
    xor ebx,ebx                   ; Zero EBX
    mov ebx, [r11+rcx*4]          ; EBX = RVA for first AddressOfName
    add rbx, r8                   ; RBX = Function name VMA / add kernel32 base address to RVA to get WinApi name
    dec rcx                       ; Decrement our loop by one, this goes from Z to A

    mov r9, qword [rax]                ; R9 = "WinExec"
    cmp [rbx], r9                      ; Compare all bytes
    jz FunctionNameFound               ; jump if zero flag is set (found function name!)
	jnz kernel32findfunction             ; didn't find the name, so keep loopin til we do!

FunctionNameFound:
push rcx                               ; found it, so save it for later
jmp OrdinalLookupSetup

FunctionNameNotFound:
int3
2
3
4
5
6
7
8
9
10
11
12
13
14
15
16
17
18
19
现在是代码的最后一部分:
OrdinalLookupSetup:  ;We found our target WinApi position in the functions lookup
   pop r15           ;getprocaddress position
   js OrdinalLookup

OrdinalLookup:
   mov rcx, r15                  ; move our function's place into RCX
   xor r11, r11                  ; clear R11 for use
   mov r11d, [rdx+0x24]          ; AddressOfNameOrdinals = RVA
   add r11, r8                   ; AddressOfNameOrdinals = VMA
   ; Get the function ordinal from AddressOfNameOrdinals
   inc rcx
   mov r13w, [r11+rcx*2]         ; AddressOfNameOrdinals + Counter. RCX = counter
   ;With the function ordinal value, we can finally lookup the WinExec address from AddressOfFunctions.

   xor r11, r11
   mov r11d, [rdx+0x1c]          ; AddressOfFunctions = RVA
   add r11, r8                   ; AddressOfFunctions VMA in R11. Kernel32+RVA for function addresses
   mov eax, [r11+r13*4]          ; function RVA.
   add rax, r8                   ; Found the WinExec Api address!!!
   push rax                      ; Store function addresses by pushing it temporarily
   js executeit
2
3
4
5
6
7
8
9
10
11
12
13
14
15
16
17
18
19
20
21
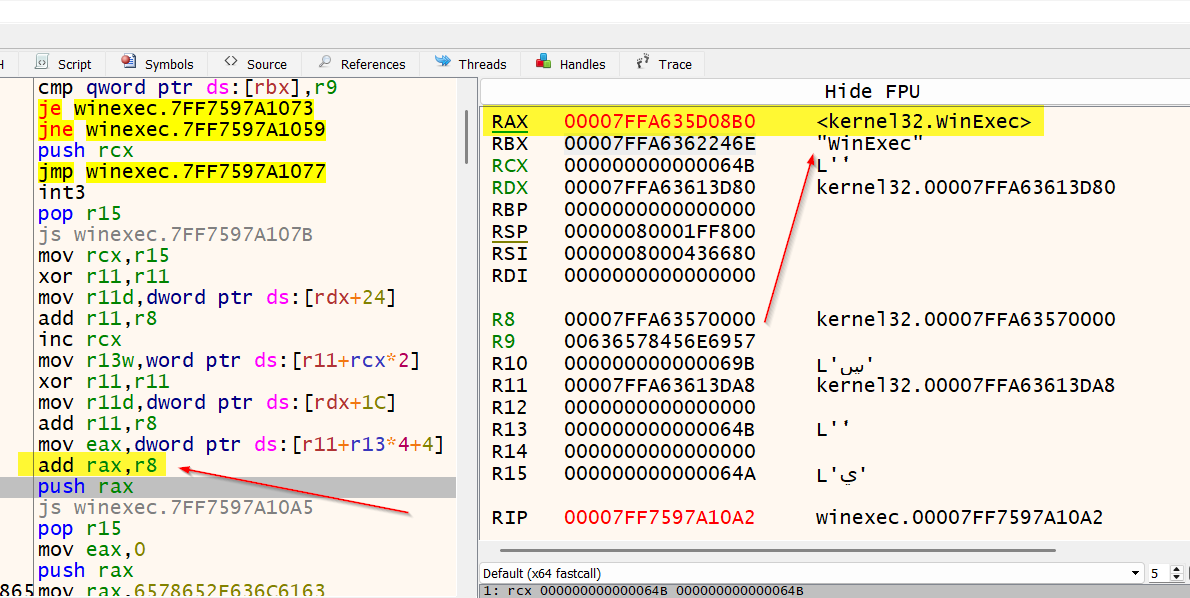
看看我们的WinExec API地址现在是否在RAX中:
果然,它在那里!
现在,让我们使用新找到的WinExec地址来执行calc.exe!
executeit:
; --- prepare to call WinExec ---
pop r15                         ;address for WinExec
mov rax, 0x00                   ;push null string terminator '0'
push rax                        ;push it onto the stack
mov rax, 0x6578652E636C6163     ; move string 'calc.exe' into RAX
push rax                        ; push string + null terminator to stack
mov rcx, rsp	                ; RDX points to stack pointer "WinExec" (1st parameter))
mov rdx, 1                      ; move 1 (show window parameter) into RDX (2nd parameter)
sub rsp, 0x30                   ; align stack 16 bytes and allow for proper setup for shadow space demands
call r15                        ; Call WinExec!!
2
3
4
5
6
7
8
9
10
11
我这里就不给计算器程序拍照啦。相信我,它加载出来了😸 然而!!! 这个编译后的程序不能正常退出,因为我们没有加载 ExitProcess。这可以作为你的作业。试着利用这篇文章中获取的信息,找到定位ExitProcess(它也在kernel32.dll中)的方法,并干净利落地退出这个程序。好了,进入我们的最后一部分……
# 第3部分 - 转换为x64 shellcode:执行自定义shellcode
首先,继续编译它:
nasm.exe -f win64 winexec.asm -o winexec.o
这将生成一个.obj文件。现在,只需执行以下操作:
objdump -d winexec.o
你应该获取你的shellcode输出以及汇编指令。这是我的输出示例。
Disassembly of section .text:

0000000000000000 <main>:
   0:   48 83 ec 28             sub    $0x28,%rsp
   4:   48 83 e4 f0             and    $0xfffffffffffffff0,%rsp
   8:   48 31 c9                xor    %rcx,%rcx
   b:   65 48 8b 41 60          mov    %gs:0x60(%rcx),%rax
  10:   48 8b 40 18             mov    0x18(%rax),%rax
  14:   48 8b 70 10             mov    0x10(%rax),%rsi
  18:   48 8b 36                mov    (%rsi),%rsi
  1b:   48 8b 36                mov    (%rsi),%rsi
  1e:   48 8b 5e 30             mov    0x30(%rsi),%rbx
  22:   49 89 d8                mov    %rbx,%r8
  25:   8b 5b 3c                mov    0x3c(%rbx),%ebx
  28:   4c 01 c3                add    %r8,%rbx
  2b:   8b 93 88 00 00 00       mov    0x88(%rbx),%edx
  31:   4c 01 c2                add    %r8,%rdx
  34:   44 8b 52 14             mov    0x14(%rdx),%r10d
  38:   4d 31 db                xor    %r11,%r11
  3b:   44 8b 5a 20             mov    0x20(%rdx),%r11d
  3f:   4d 01 c3                add    %r8,%r11
  42:   4c 89 d1                mov    %r10,%rcx
  45:   48 b8 57 69 6e 45 78    movabs $0x636578456e6957,%rax
  4c:   65 63 00
  4f:   50                      push   %rax
  50:   48 89 e0                mov    %rsp,%rax
  53:   48 83 c4 08             add    $0x8,%rsp
  57:   eb 00                   jmp    59 <kernel32findfunction>

0000000000000059 <kernel32findfunction>:
  59:   67 e3 19                jecxz  75 <FunctionNameNotFound>
  5c:   31 db                   xor    %ebx,%ebx
  5e:   41 8b 1c 8b             mov    (%r11,%rcx,4),%ebx
  62:   4c 01 c3                add    %r8,%rbx
  65:   48 ff c9                dec    %rcx
  68:   4c 8b 08                mov    (%rax),%r9
  6b:   4c 39 0b                cmp    %r9,(%rbx)
  6e:   74 02                   je     72 <FunctionNameFound>
  70:   75 e7                   jne    59 <kernel32findfunction>

0000000000000072 <FunctionNameFound>:
  72:   51                      push   %rcx
  73:   eb 01                   jmp    76 <OrdinalLookupSetup>

0000000000000075 <FunctionNameNotFound>:
  75:   cc                      int3

0000000000000076 <OrdinalLookupSetup>:
  76:   41 5f                   pop    %r15
  78:   78 00                   js     7a <OrdinalLookup>

000000000000007a <OrdinalLookup>:
  7a:   4c 89 f9                mov    %r15,%rcx
  7d:   4d 31 db                xor    %r11,%r11
  80:   44 8b 5a 24             mov    0x24(%rdx),%r11d
  84:   4d 01 c3                add    %r8,%r11
  87:   48 ff c1                inc    %rcx
  8a:   66 45 8b 2c 4b          mov    (%r11,%rcx,2),%r13w
  8f:   4d 31 db                xor    %r11,%r11
  92:   44 8b 5a 1c             mov    0x1c(%rdx),%r11d
  96:   4d 01 c3                add    %r8,%r11
  99:   43 8b 04 ab             mov    (%r11,%r13,4),%eax
  9d:   4c 01 c0                add    %r8,%rax
  a0:   50                      push   %rax
  a1:   78 00                   js     a3 <executeit>

00000000000000a3 <executeit>:
  a3:   41 5f                   pop    %r15
  a5:   b8 00 00 00 00          mov    $0x0,%eax
  aa:   50                      push   %rax
  ab:   48 b8 63 61 6c 63 2e    movabs $0x6578652e636c6163,%rax
  b2:   65 78 65
  b5:   50                      push   %rax
  b6:   48 89 e1                mov    %rsp,%rcx
  b9:   ba 01 00 00 00          mov    $0x1,%edx
  be:   48 83 ec 30             sub    $0x30,%rsp
  c2:   41 ff d7                call   *%r15
2
3
4
5
6
7
8
9
10
11
12
13
14
15
16
17
18
19
20
21
22
23
24
25
26
27
28
29
30
31
32
33
34
35
36
37
38
39
40
41
42
43
44
45
46
47
48
49
50
51
52
53
54
55
56
57
58
59
60
61
62
63
64
65
66
67
68
69
70
71
72
73
74
75
76
77
现在让我们提取 shellcode:
for i in $(objdump -D winexec.o | grep “^ “ | cut -f2); do echo -n “\x$i” ; done
只提取机器码后的样子如下:
“\x48\x83\xec\x28\x48\x83\xe4\xf0\x48\x31\xc9\x65\x48\x8b\x41\x60\x48\x8b” “\x40\x18\x48\x8b\x70\x10\x48\x8b\x36\x48\x8b\x36\x48\x8b\x5e\x30\x49\x89” “\xd8\x8b\x5b\x3c\x4c\x01\xc3\x8b\x93\x88\x00\x00\x00\x4c\x01\xc2\x44\x8b” “\x52\x14\x4d\x31\xdb\x44\x8b\x5a\x20\x4d\x01\xc3\x4c\x89\xd1\x48\xb8\x57” “\x69\x6e\x45\x78\x65\x63\x00\x50\x48\x89\xe0\x48\x83\xc4\x08\xeb\x00\x67” “\xe3\x19\x31\xdb\x41\x8b\x1c\x8b\x4c\x01\xc3\x48\xff\xc9\x4c\x8b\x08\x4c” “\x39\x0b\x74\x02\x75\xe7\x51\xeb\x01\xcc\x41\x5f\x78\x00\x4c\x89\xf9\x4d” “\x31\xdb\x44\x8b\x5a\x24\x4d\x01\xc3\x48\xff\xc1\x66\x45\x8b\x2c\x4b\x4d” “\x31\xdb\x44\x8b\x5a\x1c\x4d\x01\xc3\x43\x8b\x04\xab\x4c\x01\xc0\x50\x78” “\x00\x41\x5f\xb8\x00\x00\x00\x00\x50\x48\xb8\x63\x61\x6c\x63\x2e\x65\x78” “\x65\x50\x48\x89\xe1\xba\x01\x00\x00\x00\x48\x83\xec\x30\x41\xff\xd7”;
现在,这一切的最后一步。让我们将x64 shellcode添加到一个自定义的C++程序中并执行它!
#include <windows.h>
#include <iostream>

unsigned char shellcode[] =
"\x48\x83\xec\x28\x48\x83\xe4\xf0\x48\x31\xc9\x65\x48\x8b\x41\x60"
"\x48\x8b\x40\x18\x48\x8b\x70\x10\x48\x8b\x36\x48\x8b\x36\x48\x8b"
"\x5e\x30\x49\x89\xd8\x8b\x5b\x3c\x4c\x01\xc3\x8b\x93\x88\x00\x00"
"\x00\x4c\x01\xc2\x44\x8b\x52\x14\x4d\x31\xdb\x44\x8b\x5a\x20\x4d"
"\x01\xc3\x4c\x89\xd1\x48\xb8\x57\x69\x6e\x45\x78\x65\x63\x00\x50"
"\x48\x89\xe0\x48\x83\xc4\x08\xeb\x00\x67\xe3\x19\x31\xdb\x41\x8b"
"\x1c\x8b\x4c\x01\xc3\x48\xff\xc9\x4c\x8b\x08\x4c\x39\x0b\x74\x02"
"\x75\xe7\x51\xeb\x01\xcc\x41\x5f\x78\x00\x4c\x89\xf9\x4d\x31\xdb"
"\x44\x8b\x5a\x24\x4d\x01\xc3\x48\xff\xc1\x66\x45\x8b\x2c\x4b\x4d"
"\x31\xdb\x44\x8b\x5a\x1c\x4d\x01\xc3\x43\x8b\x04\xab\x4c\x01\xc0"
"\x50\x78\x00\x41\x5f\xb8\x00\x00\x00\x00\x50\x48\xb8\x63\x61\x6c"
"\x63\x2e\x65\x78\x65\x50\x48\x89\xe1\xba\x01\x00\x00\x00\x48\x83"
"\xec\x30\x41\xff\xd7";

int main() {
    // 注意标志位PAGE_EXECUTE_READWRITE,给这段空间的数据设置为具有读写和可执行权限
    void* exec_mem = VirtualAlloc(0, sizeof(shellcode), MEM_COMMIT | MEM_RESERVE, PAGE_EXECUTE_READWRITE);

    if (exec_mem == nullptr) {
        std::cerr << "Memory allocation failed\n";
        return -1;
    }
    memcpy(exec_mem, shellcode, sizeof(shellcode));
    auto shellcode_func = reinterpret_cast<void(*)()>(exec_mem);
    shellcode_func();
    VirtualFree(exec_mem, 0, MEM_RELEASE);
    return 0;
}
2
3
4
5
6
7
8
9
10
11
12
13
14
15
16
17
18
19
20
21
22
23
24
25
26
27
28
29
30
31
32
信不信由你,我们才刚刚热身!我希望你和我一样兴奋,因为下一部分将介绍如何去除空字节(NULL bytes),这样我们就能在缓冲区溢出漏洞利用中使用这段 shellcode 啦!😸 我也希望这部分内容能让你有所收获,并且还算容易理解。我花了不少时间才把所有信息整合起来感谢大家!下一篇文章我们将专注于去除空字节 “00”,并学习如何使用 “GetProcAddress” 动态定位函数,然后弹出一个消息框。到时候见!