 服务器端dbproxyserver源码分析
# 04 服务器端db_proxy_server源码分析
从这篇文章开始,我将详细地分析TeamTalk服务器端每一个服务的源码和架构设计。
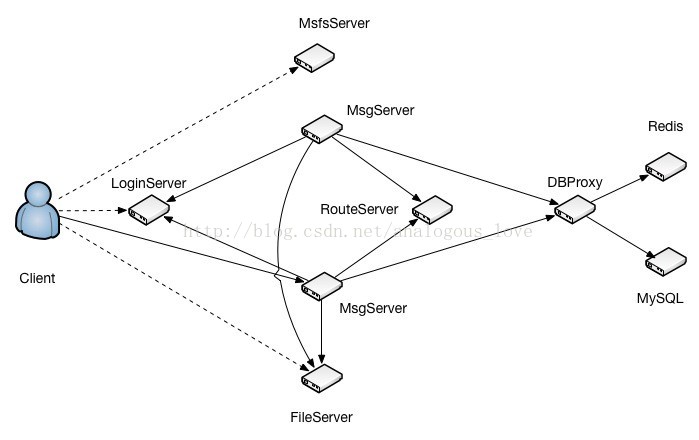
这篇从db_proxy_server开始。db_proxy_server是TeamTalk服务器端最后端的程序,它连接着关系型数据库mysql和nosql内存数据库redis。其位置在整个服务架构中如图所示:

我们从db_proxy_server的main()函数开始,main()函数其实就是做了以下初始化工作,我整理成如下伪码:
int main()
{
	//1. 初始化redis连接

	//2. 初始化mysql连接

	//3. 启动任务队列,用于处理任务

	//4. 启动从mysql同步数据到redis工作

	//5. 在端口10600上启动侦听,监听新连接

	//6. 主线程进入循环,监听新连接的到来以及出来新连接上的数据收发
}
2
3
4
5
6
7
8
9
10
11
12
13
14
下面,我们将一一介绍以上步骤。
# 一、初始化redis连接
CacheManager* pCacheManager = CacheManager::getInstance();
CacheManager* CacheManager::getInstance()
{
	if (!s_cache_manager) {
		s_cache_manager = new CacheManager();
		if (s_cache_manager->Init()) {
			delete s_cache_manager;
			s_cache_manager = NULL;
		}
	}

	return s_cache_manager;
}
2
3
4
5
6
7
8
9
10
11
12
int CacheManager::Init()
{
	CConfigFileReader config_file("dbproxyserver.conf");

    //CacheInstances=unread,group_set,token,sync,group_member
	char* cache_instances = config_file.GetConfigName("CacheInstances");
	if (!cache_instances) {
		log("not configure CacheIntance");
		return 1;
	}

	char host[64];
	char port[64];
	char db[64];
    char maxconncnt[64];
	CStrExplode instances_name(cache_instances, ',');
	for (uint32_t i = 0; i < instances_name.GetItemCnt(); i++) {
		char* pool_name = instances_name.GetItem(i);
		//printf("%s", pool_name);
		snprintf(host, 64, "%s_host", pool_name);
		snprintf(port, 64, "%s_port", pool_name);
		snprintf(db, 64, "%s_db", pool_name);
        snprintf(maxconncnt, 64, "%s_maxconncnt", pool_name);

		char* cache_host = config_file.GetConfigName(host);
		char* str_cache_port = config_file.GetConfigName(port);
		char* str_cache_db = config_file.GetConfigName(db);
        char* str_max_conn_cnt = config_file.GetConfigName(maxconncnt);
		if (!cache_host || !str_cache_port || !str_cache_db || !str_max_conn_cnt) {
			log("not configure cache instance: %s", pool_name);
			return 2;
		}

		CachePool* pCachePool = new CachePool(pool_name, cache_host, atoi(str_cache_port),
				atoi(str_cache_db), atoi(str_max_conn_cnt));
		if (pCachePool->Init()) {
			log("Init cache pool failed");
			return 3;
		}

		m_cache_pool_map.insert(make_pair(pool_name, pCachePool));
	}

	return 0;
}
2
3
4
5
6
7
8
9
10
11
12
13
14
15
16
17
18
19
20
21
22
23
24
25
26
27
28
29
30
31
32
33
34
35
36
37
38
39
40
41
42
43
44
45
在pCachePool->Init()中是实际连接redis的动作:
int CachePool::Init()
{
	for (int i = 0; i < m_cur_conn_cnt; i++) {
		CacheConn* pConn = new CacheConn(this);
		if (pConn->Init()) {
			delete pConn;
			return 1;
		}

		m_free_list.push_back(pConn);
	}

	log("cache pool: %s, list size: %lu", m_pool_name.c_str(), m_free_list.size());
	return 0;
}
2
3
4
5
6
7
8
9
10
11
12
13
14
15
pConn->Init()调用如下:
int CacheConn::Init()
{
	if (m_pContext) {
		return 0;
	}

	// 4s 尝试重连一次
	uint64_t cur_time = (uint64_t)time(NULL);
	if (cur_time < m_last_connect_time + 4) {
		return 1;
	}

	m_last_connect_time = cur_time;

	// 200ms超时
	struct timeval timeout = {0, 200000};
	m_pContext = redisConnectWithTimeout(m_pCachePool->GetServerIP(), m_pCachePool->GetServerPort(), timeout);
	if (!m_pContext || m_pContext->err) {
		if (m_pContext) {
			log("redisConnect failed: %s", m_pContext->errstr);
			redisFree(m_pContext);
			m_pContext = NULL;
		} else {
			log("redisConnect failed");
		}

		return 1;
	}

	redisReply* reply = (redisReply *)redisCommand(m_pContext, "SELECT %d", m_pCachePool->GetDBNum());
	if (reply && (reply->type == REDIS_REPLY_STATUS) && (strncmp(reply->str, "OK", 2) == 0)) {
		freeReplyObject(reply);
		return 0;
	} else {
		log("select cache db failed");
		return 2;
	}
}
2
3
4
5
6
7
8
9
10
11
12
13
14
15
16
17
18
19
20
21
22
23
24
25
26
27
28
29
30
31
32
33
34
35
36
37
38
层级关系是这样的: CacheManager的成员变量m_cache_pool_map存储了配置文件配置的redis缓存池,这是一个map对象,key是缓存池的名字,value是缓存池CachePool对象的指针。
map<string, CachePool*> m_cache_pool_map;
dbproxyserver.conf目前配置了如下几个redis缓存池:
CacheInstances=unread,group_set,token,sync,group_member
每一个缓存池对象CachePool的成员变量m_free_list中存储着若干个与redis的连接对象,具体是多少个,根据配置文件来配置。m_free_list定义:
list<CacheConn*> m_free_list;
这些与redis连接对象后面会介绍在何处使用。
# 二、初始化mysql连接
CDBManager* pDBManager = CDBManager::getInstance();
CDBManager* CDBManager::getInstance()
{
	if (!s_db_manager)
    {
		s_db_manager = new CDBManager();
		if (s_db_manager->Init()) {
			delete s_db_manager;
			s_db_manager = NULL;
		}
	}

	return s_db_manager;
}
2
3
4
5
6
7
8
9
10
11
12
13
int CDBManager::Init()
{
	CConfigFileReader config_file("dbproxyserver.conf");
    //DBInstances=teamtalk_master,teamtalk_slave
	char* db_instances = config_file.GetConfigName("DBInstances");

	if (!db_instances) {
		log("not configure DBInstances");
		return 1;
	}

	char host[64];
	char port[64];
	char dbname[64];
	char username[64];
	char password[64];
    char maxconncnt[64];
	CStrExplode instances_name(db_instances, ',');

	for (uint32_t i = 0; i < instances_name.GetItemCnt(); i++) {
		char* pool_name = instances_name.GetItem(i);
		snprintf(host, 64, "%s_host", pool_name);
		snprintf(port, 64, "%s_port", pool_name);
		snprintf(dbname, 64, "%s_dbname", pool_name);
		snprintf(username, 64, "%s_username", pool_name);
		snprintf(password, 64, "%s_password", pool_name);
        snprintf(maxconncnt, 64, "%s_maxconncnt", pool_name);

		char* db_host = config_file.GetConfigName(host);
		char* str_db_port = config_file.GetConfigName(port);
		char* db_dbname = config_file.GetConfigName(dbname);
		char* db_username = config_file.GetConfigName(username);
		char* db_password = config_file.GetConfigName(password);
        char* str_maxconncnt = config_file.GetConfigName(maxconncnt);

		if (!db_host || !str_db_port || !db_dbname || !db_username || !db_password || !str_maxconncnt) {
			log("not configure db instance: %s", pool_name);
			return 2;
		}

		int db_port = atoi(str_db_port);
        int db_maxconncnt = atoi(str_maxconncnt);
		CDBPool* pDBPool = new CDBPool(pool_name, db_host, db_port, db_username, db_password, db_dbname, db_maxconncnt);
		if (pDBPool->Init())
        {
			log("init db instance failed: %s", pool_name);
			return 3;
		}
		m_dbpool_map.insert(make_pair(pool_name, pDBPool));
	}

	return 0;
}
2
3
4
5
6
7
8
9
10
11
12
13
14
15
16
17
18
19
20
21
22
23
24
25
26
27
28
29
30
31
32
33
34
35
36
37
38
39
40
41
42
43
44
45
46
47
48
49
50
51
52
53
同理pDBPool->Init()中是实际连接mysql代码:
int CDBPool::Init()
{
	for (int i = 0; i < m_db_cur_conn_cnt; i++) {
		CDBConn* pDBConn = new CDBConn(this);
		int ret = pDBConn->Init();
		if (ret) {
			delete pDBConn;
			return ret;
		}

		m_free_list.push_back(pDBConn);
	}

	log("db pool: %s, size: %d", m_pool_name.c_str(), (int)m_free_list.size());
	return 0;
}
2
3
4
5
6
7
8
9
10
11
12
13
14
15
16
int CDBConn::Init()
{
	m_mysql = mysql_init(NULL);
	if (!m_mysql) {
		log("mysql_init failed");
		return 1;
	}

	my_bool reconnect = true;
	mysql_options(m_mysql, MYSQL_OPT_RECONNECT, &reconnect);
	mysql_options(m_mysql, MYSQL_SET_CHARSET_NAME, "utf8mb4");

	if (!mysql_real_connect(m_mysql, m_pDBPool->GetDBServerIP(), m_pDBPool->GetUsername(), ""/*m_pDBPool->GetPasswrod()*/,
			m_pDBPool->GetDBName(), m_pDBPool->GetDBServerPort(), NULL, 0)) {
		log("mysql_real_connect failed: %s", mysql_error(m_mysql));
		return 2;
	}

	return 0;
}
2
3
4
5
6
7
8
9
10
11
12
13
14
15
16
17
18
19
20
与redis连接对象类似,CDBManager的成员对象m_dbpool_map存储了mysql连接池,这也是一个stl map,key是池子的名字,value是连接池的对象CDBPool指针。配置文件中总共配置了名称为主从两个mysql连接池。
DBInstances=teamtalk_master,teamtalk_slave
连接池对象CDBPool用一个成员变量存储自己的若干个mysql连接:
list<CDBConn*> m_free_list; //实际保存mysql连接的容器
具体每个连接池有多少个mysql连接,根据配置文件得到,这里主从两个库都是16个。
这些mysql连接的用途后面介绍。
# 三、启动任务队列,用于处理任务
初始化一:创建线程处理任务队列中的任务
init_proxy_conn(thread_num);
int init_proxy_conn(uint32_t thread_num)
{
	s_handler_map = CHandlerMap::getInstance();
	g_thread_pool.Init(thread_num);

	netlib_add_loop(proxy_loop_callback, NULL);

	signal(SIGTERM, sig_handler);

	return netlib_register_timer(proxy_timer_callback, NULL, 1000);
}
2
3
4
5
6
7
8
9
10
11
线程数量根据配置文件得到。g_thread_pool.Init(thread_num)中实际创建处理任务的线程。
int CThreadPool::Init(uint32_t worker_size)
{
    m_worker_size = worker_size;
	m_worker_list = new CWorkerThread [m_worker_size];
	if (!m_worker_list) {
		return 1;
	}

	for (uint32_t i = 0; i < m_worker_size; i++) {
		m_worker_list[i].SetThreadIdx(i);
		m_worker_list[i].Start();
	}

	return 0;
}
2
3
4
5
6
7
8
9
10
11
12
13
14
15
void CWorkerThread::Start()
{
	(void)pthread_create(&m_thread_id, NULL, StartRoutine, this);
}
2
3
4
线程函数调用序列如下:
void* CWorkerThread::StartRoutine(void* arg)
{
	CWorkerThread* pThread = (CWorkerThread*)arg;

	pThread->Execute();

	return NULL;
}
2
3
4
5
6
7
8
void CWorkerThread::Execute()
{
	while (true) {
		m_thread_notify.Lock();

		// put wait in while cause there can be spurious wake up (due to signal/ENITR)
		while (m_task_list.empty()) {
			m_thread_notify.Wait();
		}

		CTask* pTask = m_task_list.front();
		m_task_list.pop_front();
		m_thread_notify.Unlock();

		pTask->run();

		delete pTask;

		m_task_cnt++;
		//log("%d have the execute %d task\n", m_thread_idx, m_task_cnt);
	}
}
2
3
4
5
6
7
8
9
10
11
12
13
14
15
16
17
18
19
20
21
22
可以看到工作线程一直在等待一个条件变量,当向任务队列中添加任务时,条件变量被唤醒:
void CWorkerThread::PushTask(CTask* pTask)
{
	m_thread_notify.Lock();
	m_task_list.push_back(pTask);
	m_thread_notify.Signal();
	m_thread_notify.Unlock();
}
2
3
4
5
6
7
任务队列的用途,下文会介绍。
初始化二:将各个任务id与对应的处理函数绑定起来:
s_handler_map = CHandlerMap::getInstance();
CHandlerMap* CHandlerMap::getInstance()
{
	if (!s_handler_instance) {
		s_handler_instance = new CHandlerMap();
		s_handler_instance->Init();
	}

	return s_handler_instance;
}
2
3
4
5
6
7
8
9
void CHandlerMap::Init()
{
    //DB_PROXY是命名空间,不是类名
	// Login validate
	m_handler_map.insert(make_pair(uint32_t(CID_OTHER_VALIDATE_REQ), DB_PROXY::doLogin));
    m_handler_map.insert(make_pair(uint32_t(CID_LOGIN_REQ_PUSH_SHIELD), DB_PROXY::doPushShield));
    m_handler_map.insert(make_pair(uint32_t(CID_LOGIN_REQ_QUERY_PUSH_SHIELD), DB_PROXY::doQueryPushShield));

    // recent session
    m_handler_map.insert(make_pair(uint32_t(CID_BUDDY_LIST_RECENT_CONTACT_SESSION_REQUEST), DB_PROXY::getRecentSession));
    m_handler_map.insert(make_pair(uint32_t(CID_BUDDY_LIST_REMOVE_SESSION_REQ), DB_PROXY::deleteRecentSession));

    // users
    m_handler_map.insert(make_pair(uint32_t(CID_BUDDY_LIST_USER_INFO_REQUEST), DB_PROXY::getUserInfo));
    m_handler_map.insert(make_pair(uint32_t(CID_BUDDY_LIST_ALL_USER_REQUEST), DB_PROXY::getChangedUser));
    m_handler_map.insert(make_pair(uint32_t(CID_BUDDY_LIST_DEPARTMENT_REQUEST), DB_PROXY::getChgedDepart));
    m_handler_map.insert(make_pair(uint32_t(CID_BUDDY_LIST_CHANGE_SIGN_INFO_REQUEST), DB_PROXY::changeUserSignInfo));


    // message content
    m_handler_map.insert(make_pair(uint32_t(CID_MSG_DATA), DB_PROXY::sendMessage));
    m_handler_map.insert(make_pair(uint32_t(CID_MSG_LIST_REQUEST), DB_PROXY::getMessage));
    m_handler_map.insert(make_pair(uint32_t(CID_MSG_UNREAD_CNT_REQUEST), DB_PROXY::getUnreadMsgCounter));
    m_handler_map.insert(make_pair(uint32_t(CID_MSG_READ_ACK), DB_PROXY::clearUnreadMsgCounter));
    m_handler_map.insert(make_pair(uint32_t(CID_MSG_GET_BY_MSG_ID_REQ), DB_PROXY::getMessageById));
    m_handler_map.insert(make_pair(uint32_t(CID_MSG_GET_LATEST_MSG_ID_REQ), DB_PROXY::getLatestMsgId));

    // device token
    m_handler_map.insert(make_pair(uint32_t(CID_LOGIN_REQ_DEVICETOKEN), DB_PROXY::setDevicesToken));
    m_handler_map.insert(make_pair(uint32_t(CID_OTHER_GET_DEVICE_TOKEN_REQ), DB_PROXY::getDevicesToken));

    //push 推送设置
    m_handler_map.insert(make_pair(uint32_t(CID_GROUP_SHIELD_GROUP_REQUEST), DB_PROXY::setGroupPush));
    m_handler_map.insert(make_pair(uint32_t(CID_OTHER_GET_SHIELD_REQ), DB_PROXY::getGroupPush));


    // group
    m_handler_map.insert(make_pair(uint32_t(CID_GROUP_NORMAL_LIST_REQUEST), DB_PROXY::getNormalGroupList));
    m_handler_map.insert(make_pair(uint32_t(CID_GROUP_INFO_REQUEST), DB_PROXY::getGroupInfo));
    m_handler_map.insert(make_pair(uint32_t(CID_GROUP_CREATE_REQUEST), DB_PROXY::createGroup));
    m_handler_map.insert(make_pair(uint32_t(CID_GROUP_CHANGE_MEMBER_REQUEST), DB_PROXY::modifyMember));


    // file
    m_handler_map.insert(make_pair(uint32_t(CID_FILE_HAS_OFFLINE_REQ), DB_PROXY::hasOfflineFile));
    m_handler_map.insert(make_pair(uint32_t(CID_FILE_ADD_OFFLINE_REQ), DB_PROXY::addOfflineFile));
    m_handler_map.insert(make_pair(uint32_t(CID_FILE_DEL_OFFLINE_REQ), DB_PROXY::delOfflineFile));
}	m_handler_map.insert(make_pair(uint32_t(CID_OTHER_VALIDATE_REQ), DB_PROXY::doLogin));
    m_handler_map.insert(make_pair(uint32_t(CID_LOGIN_REQ_PUSH_SHIELD), DB_PROXY::doPushShield));
    m_handler_map.insert(make_pair(uint32_t(CID_LOGIN_REQ_QUERY_PUSH_SHIELD), DB_PROXY::doQueryPushShield));

    // recent session
    m_handler_map.insert(make_pair(uint32_t(CID_BUDDY_LIST_RECENT_CONTACT_SESSION_REQUEST), DB_PROXY::getRecentSession));
    m_handler_map.insert(make_pair(uint32_t(CID_BUDDY_LIST_REMOVE_SESSION_REQ), DB_PROXY::deleteRecentSession));

    // users
    m_handler_map.insert(make_pair(uint32_t(CID_BUDDY_LIST_USER_INFO_REQUEST), DB_PROXY::getUserInfo));
    m_handler_map.insert(make_pair(uint32_t(CID_BUDDY_LIST_ALL_USER_REQUEST), DB_PROXY::getChangedUser));
    m_handler_map.insert(make_pair(uint32_t(CID_BUDDY_LIST_DEPARTMENT_REQUEST), DB_PROXY::getChgedDepart));
    m_handler_map.insert(make_pair(uint32_t(CID_BUDDY_LIST_CHANGE_SIGN_INFO_REQUEST), DB_PROXY::changeUserSignInfo));


    // message content
    m_handler_map.insert(make_pair(uint32_t(CID_MSG_DATA), DB_PROXY::sendMessage));
    m_handler_map.insert(make_pair(uint32_t(CID_MSG_LIST_REQUEST), DB_PROXY::getMessage));
    m_handler_map.insert(make_pair(uint32_t(CID_MSG_UNREAD_CNT_REQUEST), DB_PROXY::getUnreadMsgCounter));
    m_handler_map.insert(make_pair(uint32_t(CID_MSG_READ_ACK), DB_PROXY::clearUnreadMsgCounter));
    m_handler_map.insert(make_pair(uint32_t(CID_MSG_GET_BY_MSG_ID_REQ), DB_PROXY::getMessageById));
    m_handler_map.insert(make_pair(uint32_t(CID_MSG_GET_LATEST_MSG_ID_REQ), DB_PROXY::getLatestMsgId));

    // device token
    m_handler_map.insert(make_pair(uint32_t(CID_LOGIN_REQ_DEVICETOKEN), DB_PROXY::setDevicesToken));
    m_handler_map.insert(make_pair(uint32_t(CID_OTHER_GET_DEVICE_TOKEN_REQ), DB_PROXY::getDevicesToken));

    //push 推送设置
    m_handler_map.insert(make_pair(uint32_t(CID_GROUP_SHIELD_GROUP_REQUEST), DB_PROXY::setGroupPush));
    m_handler_map.insert(make_pair(uint32_t(CID_OTHER_GET_SHIELD_REQ), DB_PROXY::getGroupPush));


    // group
    m_handler_map.insert(make_pair(uint32_t(CID_GROUP_NORMAL_LIST_REQUEST), DB_PROXY::getNormalGroupList));
    m_handler_map.insert(make_pair(uint32_t(CID_GROUP_INFO_REQUEST), DB_PROXY::getGroupInfo));
    m_handler_map.insert(make_pair(uint32_t(CID_GROUP_CREATE_REQUEST), DB_PROXY::createGroup));
    m_handler_map.insert(make_pair(uint32_t(CID_GROUP_CHANGE_MEMBER_REQUEST), DB_PROXY::modifyMember));


    // file
    m_handler_map.insert(make_pair(uint32_t(CID_FILE_HAS_OFFLINE_REQ), DB_PROXY::hasOfflineFile));
    m_handler_map.insert(make_pair(uint32_t(CID_FILE_ADD_OFFLINE_REQ), DB_PROXY::addOfflineFile));
    m_handler_map.insert(make_pair(uint32_t(CID_FILE_DEL_OFFLINE_REQ), DB_PROXY::delOfflineFile));
}
2
3
4
5
6
7
8
9
10
11
12
13
14
15
16
17
18
19
20
21
22
23
24
25
26
27
28
29
30
31
32
33
34
35
36
37
38
39
40
41
42
43
44
45
46
47
48
49
50
51
52
53
54
55
56
57
58
59
60
61
62
63
64
65
66
67
68
69
70
71
72
73
74
75
76
77
78
79
80
81
82
83
84
85
86
87
88
89
90
91
# 四、启动从mysql同步数据到redis工作
CSyncCenter::getInstance()->init();
CSyncCenter::getInstance()->startSync();
2
CSyncCenter::getInstance()->init()是获得上次同步的数据位置,接下来同步从这个位置开始。
/*
 * 初始化函数,从cache里面加载上次同步的时间信息等
 */
void CSyncCenter::init()
{
    // Load total update time
    CacheManager* pCacheManager = CacheManager::getInstance();
    // increase message count
    CacheConn* pCacheConn = pCacheManager->GetCacheConn("unread");
    if (pCacheConn)
    {
        string strTotalUpdate = pCacheConn->get("total_user_updated");

        string strLastUpdateGroup = pCacheConn->get("last_update_group");
        pCacheManager->RelCacheConn(pCacheConn);
	if(strTotalUpdate != "")
        {
            m_nLastUpdate = string2int(strTotalUpdate);
        }
        else
        {
            updateTotalUpdate(time(NULL));
        }
        if(strLastUpdateGroup.empty())
        {
            m_nLastUpdateGroup = string2int(strLastUpdateGroup);
        }
        else
        {
            updateLastUpdateGroup(time(NULL));
        }
    }
    else
    {
        log("no cache connection to get total_user_updated");
    }
}
2
3
4
5
6
7
8
9
10
11
12
13
14
15
16
17
18
19
20
21
22
23
24
25
26
27
28
29
30
31
32
33
34
35
36
37
CSyncCenter::getInstance()->startSync();新开启一个线程进行同步工作:
/**
 *  开启内网数据同步以及群组聊天记录同步
 */
void CSyncCenter::startSync()
{
#ifdef _WIN32
    (void)CreateThread(NULL, 0, doSyncGroupChat, NULL, 0, &m_nGroupChatThreadId);
#else
    (void)pthread_create(&m_nGroupChatThreadId, NULL, doSyncGroupChat, NULL);
#endif
}
2
3
4
5
6
7
8
9
10
11
线程函数doSyncGroupChat()如下:
/**
 *  同步群组聊天信息
 *
 *  @param arg NULL
 *
 *  @return NULL
 */
void* CSyncCenter::doSyncGroupChat(void* arg)
{
    m_bSyncGroupChatRuning = true;
    CDBManager* pDBManager = CDBManager::getInstance();
    map<uint32_t, uint32_t> mapChangedGroup;
    do{
        mapChangedGroup.clear();
        CDBConn* pDBConn = pDBManager->GetDBConn("teamtalk_slave");
        if(pDBConn)
        {
            string strSql = "select id, lastChated from IMGroup where status=0 and lastChated >=" + int2string(m_pInstance->getLastUpdateGroup());
            CResultSet* pResult = pDBConn->ExecuteQuery(strSql.c_str());
            if(pResult)
            {
                while (pResult->Next()) {
                    uint32_t nGroupId = pResult->GetInt("id");
                    uint32_t nLastChat = pResult->GetInt("lastChated");
                    if(nLastChat != 0)
                    {
                        mapChangedGroup[nGroupId] = nLastChat;
                    }
                }
                delete pResult;
            }
            pDBManager->RelDBConn(pDBConn);
        }
        else
        {
            log("no db connection for teamtalk_slave");
        }
        m_pInstance->updateLastUpdateGroup(time(NULL));
        for (auto it=mapChangedGroup.begin(); it!=mapChangedGroup.end(); ++it)
        {
            uint32_t nGroupId =it->first;
            list<uint32_t> lsUsers;
            uint32_t nUpdate = it->second;
            CGroupModel::getInstance()->getGroupUser(nGroupId, lsUsers);
            for (auto it1=lsUsers.begin(); it1!=lsUsers.end(); ++it1)
            {
                uint32_t nUserId = *it1;
                uint32_t nSessionId = INVALID_VALUE;
                nSessionId = CSessionModel::getInstance()->getSessionId(nUserId, nGroupId, IM::BaseDefine::SESSION_TYPE_GROUP, true);
                if(nSessionId != INVALID_VALUE)
                {
                    CSessionModel::getInstance()->updateSession(nSessionId, nUpdate);
                }
                else
                {
                    CSessionModel::getInstance()->addSession(nUserId, nGroupId, IM::BaseDefine::SESSION_TYPE_GROUP);
                }
            }
        }
//    } while (!m_pInstance->m_pCondSync->waitTime(5*1000));
    } while (m_pInstance->m_bSyncGroupChatWaitting && !(m_pInstance->m_pCondGroupChat->waitTime(5*1000)));
//    } while(m_pInstance->m_bSyncGroupChatWaitting);
    m_bSyncGroupChatRuning = false;
    return NULL;
}
2
3
4
5
6
7
8
9
10
11
12
13
14
15
16
17
18
19
20
21
22
23
24
25
26
27
28
29
30
31
32
33
34
35
36
37
38
39
40
41
42
43
44
45
46
47
48
49
50
51
52
53
54
55
56
57
58
59
60
61
62
63
64
65
可以看到流程就是先用sql从mysql取出数据,再用“sql”写到redis中去。操作mysql和redis时,并没有新建新连接,而是使用上文介绍的连接池和缓存池中已有的连接。我们上文说了,每个池中都有若干个连接,那使用哪个连接呢?由于保存mysql的连接是一个list对象,所以默认从list的头部取一个可用的。如果当前没有空闲连接可用,则新建一个:
CDBConn* CDBPool::GetDBConn()
{
	m_free_notify.Lock();

	while (m_free_list.empty()) {
		if (m_db_cur_conn_cnt >= m_db_max_conn_cnt) {
			m_free_notify.Wait();
		} else {
			CDBConn* pDBConn = new CDBConn(this);
			int ret = pDBConn->Init();
			if (ret) {
				log("Init DBConnecton failed");
				delete pDBConn;
				m_free_notify.Unlock();
				return NULL;
			} else {
				m_free_list.push_back(pDBConn);
				m_db_cur_conn_cnt++;
				log("new db connection: %s, conn_cnt: %d", m_pool_name.c_str(), m_db_cur_conn_cnt);
			}
		}
	}

	CDBConn* pConn = m_free_list.front();
	m_free_list.pop_front();

	m_free_notify.Unlock();

	return pConn;
}
2
3
4
5
6
7
8
9
10
11
12
13
14
15
16
17
18
19
20
21
22
23
24
25
26
27
28
29
30
分配redis和mysql的一模一样,这里代码就不贴了。
# 五、在端口10600上启动侦听,监听新连接
CStrExplode listen_ip_list(listen_ip, ';');
for (uint32_t i = 0; i < listen_ip_list.GetItemCnt(); i++) {
    ret = netlib_listen(listen_ip_list.GetItem(i), listen_port, proxy_serv_callback, NULL);
    if (ret == NETLIB_ERROR)
        return ret;
}
2
3
4
5
6
netlib_listen()创建CBaseSocket对象,并将回调函数指针proxy_serv_callback保存在CBaseSocket对象中。
int netlib_listen(
		const char*	server_ip,
		uint16_t	port,
		callback_t	callback,
		void*		callback_data)
{
	CBaseSocket* pSocket = new CBaseSocket();
	if (!pSocket)
		return NETLIB_ERROR;

	int ret =  pSocket->Listen(server_ip, port, callback, callback_data);
	if (ret == NETLIB_ERROR)
		delete pSocket;
	return ret;
}
2
3
4
5
6
7
8
9
10
11
12
13
14
15
pSocket->Listen()是实际调用bind()和listen()函数创建侦听的地方。
int CBaseSocket::Listen(const char* server_ip, uint16_t port, callback_t callback, void* callback_data)
{
	m_local_ip = server_ip;
	m_local_port = port;
	m_callback = callback;
	m_callback_data = callback_data;

	m_socket = socket(AF_INET, SOCK_STREAM, 0);
	if (m_socket == INVALID_SOCKET)
	{
		printf("socket failed, err_code=%d\n", _GetErrorCode());
		return NETLIB_ERROR;
	}

	_SetReuseAddr(m_socket);
	_SetNonblock(m_socket);

	sockaddr_in serv_addr;
	_SetAddr(server_ip, port, &serv_addr);
    int ret = ::bind(m_socket, (sockaddr*)&serv_addr, sizeof(serv_addr));
	if (ret == SOCKET_ERROR)
	{
		log("bind failed, err_code=%d", _GetErrorCode());
		closesocket(m_socket);
		return NETLIB_ERROR;
	}

	ret = listen(m_socket, 64);
	if (ret == SOCKET_ERROR)
	{
		log("listen failed, err_code=%d", _GetErrorCode());
		closesocket(m_socket);
		return NETLIB_ERROR;
	}

	m_state = SOCKET_STATE_LISTENING;

	log("CBaseSocket::Listen on %s:%d", server_ip, port);

	AddBaseSocket(this);
	CEventDispatch::Instance()->AddEvent(m_socket, SOCKET_READ | SOCKET_EXCEP);
	return NETLIB_OK;
}
2
3
4
5
6
7
8
9
10
11
12
13
14
15
16
17
18
19
20
21
22
23
24
25
26
27
28
29
30
31
32
33
34
35
36
37
38
39
40
41
42
43
这个函数有大量的细节需要注意:
socket被设置成非阻塞模式;
将绑定的地址设置成reuse(具体原因,我在《服务器编程心得》系列已经介绍过)
将socket的状态设置成SOCKET_STATE_LISTENING,这个状态将侦听的socket与普通客户端连接的socket区别开来。
AddBaseSocket(this);将socket句柄和对应的CBaseSocket放到一个全局对象中管理起来。
typedef hash_map<net_handle_t, CBaseSocket*> SocketMap;
SocketMap	g_socket_map;

void AddBaseSocket(CBaseSocket* pSocket)
{
	g_socket_map.insert(make_pair((net_handle_t)pSocket->GetSocket(), pSocket));
}
2
3
4
5
6
7
之所以不用map而用hash_map是因为STL的map底层是用红黑树实现的,查找时间复杂度是log(n),而hash_map底层是用hash表存储的,查询时间复杂度是O(1)。后面会介绍将在这个hash_map中查找所有的socket。
- 目前只关注socket的读和异常事件,侦听socket可读意味着有新连接到来,异常就意味着侦听出错。对于服务器程序一般要关闭或重启服务。
# 六、主线程进入循环,监听新连接的到来以及出来新连接上的数据收发
netlib_eventloop(10)
10是超时时间,用于select()函数的调用:
void netlib_eventloop(uint32_t wait_timeout)
{
	CEventDispatch::Instance()->StartDispatch(wait_timeout);
}
2
3
4
void CEventDispatch::StartDispatch(uint32_t wait_timeout)
{
	fd_set read_set, write_set, excep_set;
	timeval timeout;
	timeout.tv_sec = 0;
	timeout.tv_usec = wait_timeout * 1000;	// 10 millisecond

    if(running)
        return;
    running = true;

    while (running)
	{
		_CheckTimer();
        _CheckLoop();

		if (!m_read_set.fd_count && !m_write_set.fd_count && !m_excep_set.fd_count)
		{
			Sleep(MIN_TIMER_DURATION);
			continue;
		}

		m_lock.lock();
		memcpy(&read_set, &m_read_set, sizeof(fd_set));
		memcpy(&write_set, &m_write_set, sizeof(fd_set));
		memcpy(&excep_set, &m_excep_set, sizeof(fd_set));
		m_lock.unlock();

		int nfds = select(0, &read_set, &write_set, &excep_set, &timeout);

		if (nfds == SOCKET_ERROR)
		{
			log("select failed, error code: %d", GetLastError());
			Sleep(MIN_TIMER_DURATION);
			continue;			// select again
		}

		if (nfds == 0)
		{
			continue;
		}

		for (u_int i = 0; i < read_set.fd_count; i++)
		{
			//log("select return read count=%d\n", read_set.fd_count);
			SOCKET fd = read_set.fd_array[i];
			CBaseSocket* pSocket = FindBaseSocket((net_handle_t)fd);
			if (pSocket)
			{
				pSocket->OnRead();
				pSocket->ReleaseRef();
			}
		}

		for (u_int i = 0; i < write_set.fd_count; i++)
		{
			//log("select return write count=%d\n", write_set.fd_count);
			SOCKET fd = write_set.fd_array[i];
			CBaseSocket* pSocket = FindBaseSocket((net_handle_t)fd);
			if (pSocket)
			{
				pSocket->OnWrite();
				pSocket->ReleaseRef();
			}
		}

		for (u_int i = 0; i < excep_set.fd_count; i++)
		{
			//log("select return exception count=%d\n", excep_set.fd_count);
			SOCKET fd = excep_set.fd_array[i];
			CBaseSocket* pSocket = FindBaseSocket((net_handle_t)fd);
			if (pSocket)
			{
				pSocket->OnClose();
				pSocket->ReleaseRef();
			}
		}

	}
}
2
3
4
5
6
7
8
9
10
11
12
13
14
15
16
17
18
19
20
21
22
23
24
25
26
27
28
29
30
31
32
33
34
35
36
37
38
39
40
41
42
43
44
45
46
47
48
49
50
51
52
53
54
55
56
57
58
59
60
61
62
63
64
65
66
67
68
69
70
71
72
73
74
75
76
77
78
79
80
这个函数是整个服务程序的动力和消息泵。我把它简化成如下伪码来重点介绍一下:
while(退出条件)
{
	//1. 遍历定时器队列,检测是否有定时器事件到期,有则执行定时器的回调函数

	//2. 遍历其他任务队列,检测是否有其他任务需要执行,有,执行之

	//3. 检测socket集合,分离可读、可写和异常事件

	//4. 处理socket可读事件

	//5. 处理socket可写事件

	//6. 处理socket异常事件
}
2
3
4
5
6
7
8
9
10
11
12
13
14
我们先不说1、2两点,当程序初始化后,socket集合中,也只有一个socket,就是上文中说的侦听socket。当有新连接来的时候,该socket被检测到可读。执行
for (u_int i = 0; i < read_set.fd_count; i++)
{
	//log("select return read count=%d\n", read_set.fd_count);
	SOCKET fd = read_set.fd_array[i];
	CBaseSocket* pSocket = FindBaseSocket((net_handle_t)fd);
	if (pSocket)
	{
		pSocket->OnRead();
		pSocket->ReleaseRef();
	}
}	//log("select return read count=%d\n", read_set.fd_count);
	SOCKET fd = read_set.fd_array[i];
	CBaseSocket* pSocket = FindBaseSocket((net_handle_t)fd);
	if (pSocket)
	{
		pSocket->OnRead();
		pSocket->ReleaseRef();
	}
}
2
3
4
5
6
7
8
9
10
11
12
13
14
15
16
17
18
19
FindBaseSocket()就是在上文提到的socket集合map中通过句柄查找socket:
CBaseSocket* FindBaseSocket(net_handle_t fd)
{
	CBaseSocket* pSocket = NULL;
	SocketMap::iterator iter = g_socket_map.find(fd);
	if (iter != g_socket_map.end())
	{
		pSocket = iter->second;
		pSocket->AddRef();
	}

	return pSocket;
}
2
3
4
5
6
7
8
9
10
11
12
接着执行pSocket->OnRead():
void CBaseSocket::OnRead()
{
	if (m_state == SOCKET_STATE_LISTENING)
	{
		_AcceptNewSocket();
	}
	else
	{
		u_long avail = 0;
		if ( (ioctlsocket(m_socket, FIONREAD, &avail) == SOCKET_ERROR) || (avail == 0) )
		{
			m_callback(m_callback_data, NETLIB_MSG_CLOSE, (net_handle_t)m_socket, NULL);
		}
		else
		{
			m_callback(m_callback_data, NETLIB_MSG_READ, (net_handle_t)m_socket, NULL);
		}
	}
}
2
3
4
5
6
7
8
9
10
11
12
13
14
15
16
17
18
19
因为是侦听socket,其状态被设置成SOCKET_STATE_LISTENING(上文介绍了)。接着就接受新连接。
void CBaseSocket::_AcceptNewSocket()
{
	SOCKET fd = 0;
	sockaddr_in peer_addr;
	socklen_t addr_len = sizeof(sockaddr_in);
	char ip_str[64];
	while ( (fd = accept(m_socket, (sockaddr*)&peer_addr, &addr_len)) != INVALID_SOCKET )
	{
		CBaseSocket* pSocket = new CBaseSocket();
		uint32_t ip = ntohl(peer_addr.sin_addr.s_addr);
		uint16_t port = ntohs(peer_addr.sin_port);

		snprintf(ip_str, sizeof(ip_str), "%d.%d.%d.%d", ip >> 24, (ip >> 16) & 0xFF, (ip >> 8) & 0xFF, ip & 0xFF);

		log("AcceptNewSocket, socket=%d from %s:%d\n", fd, ip_str, port);

		pSocket->SetSocket(fd);
		pSocket->SetCallback(m_callback);
		pSocket->SetCallbackData(m_callback_data);
		pSocket->SetState(SOCKET_STATE_CONNECTED);
		pSocket->SetRemoteIP(ip_str);
		pSocket->SetRemotePort(port);

		_SetNoDelay(fd);
		_SetNonblock(fd);
		AddBaseSocket(pSocket);
		CEventDispatch::Instance()->AddEvent(fd, SOCKET_READ | SOCKET_EXCEP);
		m_callback(m_callback_data, NETLIB_MSG_CONNECT, (net_handle_t)fd, NULL);
	}
}
2
3
4
5
6
7
8
9
10
11
12
13
14
15
16
17
18
19
20
21
22
23
24
25
26
27
28
29
30
接收新连接,需要注意以下事项:
产生一个新的socket和对应的CBaseSocket对象。
该socket和对应的CBaseSocket对象和侦听socket一样也被加入全局g_socket_map中进行管理。
新socket同样被设置成非阻塞的。
禁用该socket的nagle算法(_SetNoDelay(fd);)。
关注该socket的读和异常事件(CEventDispatch::Instance()->AddEvent(fd, SOCKET_READ | SOCKET_EXCEP);)。
将socket的状态设置成SOCKET_STATE_CONNECTED。
调用侦听socket的的回调函数m_callback(m_callback_data, NETLIB_MSG_CONNECT, (net_handle_t)fd, NULL),并传入消息类型是NETLIB_MSG_CONNECT。
这个回调函数在上面初始化侦听函数设置的,指向函数proxy_serv_callback。调用代码如下:
void proxy_serv_callback(void* callback_data, uint8_t msg, uint32_t handle, void* pParam)
{
    if (msg == NETLIB_MSG_CONNECT)
    {
        CProxyConn* pConn = new CProxyConn();
        pConn->OnConnect(handle);
    }
    else
    {
        log("!!!error msg: %d", msg);
    }
}
2
3
4
5
6
7
8
9
10
11
12
接着调用CProxyConn的OnConnect()函数:
void CProxyConn::OnConnect(net_handle_t handle)
{
	m_handle = handle;

	g_proxy_conn_map.insert(make_pair(handle, this));

	netlib_option(handle, NETLIB_OPT_SET_CALLBACK, (void*)imconn_callback);
	netlib_option(handle, NETLIB_OPT_SET_CALLBACK_DATA, (void*)&g_proxy_conn_map);
	netlib_option(handle, NETLIB_OPT_GET_REMOTE_IP, (void*)&m_peer_ip);
	netlib_option(handle, NETLIB_OPT_GET_REMOTE_PORT, (void*)&m_peer_port);

	log("connect from %s:%d, handle=%d", m_peer_ip.c_str(), m_peer_port, m_handle);
}
2
3
4
5
6
7
8
9
10
11
12
13
注意!这里,已经悄悄地将该新socket的回调函数由proxy_serv_callback偷偷地换成了imconn_callback。同时,将该连接对象放入一个全局map g_proxy_conn_map中:
typedef hash_map<net_handle_t, CImConn*> ConnMap_t;
static ConnMap_t g_proxy_conn_map;
同样,该map的key是socket句柄,value是连接对象基类的指针。
至此,对于侦听socket,如果socket可读,则接收新连接,并置换其默认OnRead的回调函数为imconn_callback;而对于新socket,如果socket可读,则会调用imconn_callback。
我们接着看新socket可读的处理流程:
void CBaseSocket::OnRead()
{
	if (m_state == SOCKET_STATE_LISTENING)
	{
		_AcceptNewSocket();
	}
	else
	{
		u_long avail = 0;
		if ( (ioctlsocket(m_socket, FIONREAD, &avail) == SOCKET_ERROR) || (avail == 0) )
		{
			m_callback(m_callback_data, NETLIB_MSG_CLOSE, (net_handle_t)m_socket, NULL);
		}
		else
		{
			m_callback(m_callback_data, NETLIB_MSG_READ, (net_handle_t)m_socket, NULL);
		}
	}
}
2
3
4
5
6
7
8
9
10
11
12
13
14
15
16
17
18
19
上述OnRead函数会走else分支,先调用ioctlsocket获得可读的数据字节数。如果出错或者字节数为0,则以消息NETLIB_MSG_CLOSE调用回调函数imconn_callback,
反之,以消息NETLIB_MSG_READ调用回调函数imconn_callback。
void imconn_callback(void* callback_data, uint8_t msg, uint32_t handle, void* pParam)
{
	NOTUSED_ARG(handle);
	NOTUSED_ARG(pParam);

	if (!callback_data)
		return;

	ConnMap_t* conn_map = (ConnMap_t*)callback_data;
	CImConn* pConn = FindImConn(conn_map, handle);
	if (!pConn)
		return;

	//log("msg=%d, handle=%d ", msg, handle);

	switch (msg)
	{
	case NETLIB_MSG_CONFIRM:
		pConn->OnConfirm();
		break;
	case NETLIB_MSG_READ:
		pConn->OnRead();
		break;
	case NETLIB_MSG_WRITE:
		pConn->OnWrite();
		break;
	case NETLIB_MSG_CLOSE:
		pConn->OnClose();
		break;
	default:
		log("!!!imconn_callback error msg: %d ", msg);
		break;
	}

	pConn->ReleaseRef();
}
2
3
4
5
6
7
8
9
10
11
12
13
14
15
16
17
18
19
20
21
22
23
24
25
26
27
28
29
30
31
32
33
34
35
36
出错消息NETLIB_MSG_CLOSE没啥好看的,无非是关闭连接。我们来看NETLIB_MSG_READ消息,会调用pConn->OnRead(),pConn是一个CImConn指针,但根据上文介绍我们知道,其实际是一个CImConn的子类CProxyConn对象:
class CProxyConn : public CImConn {
所以pConn->OnRead()实际会调用CProxyConn的OnRead():
void CProxyConn::OnRead()
{
	for (;;) {
		uint32_t free_buf_len = m_in_buf.GetAllocSize() - m_in_buf.GetWriteOffset();
		if (free_buf_len < READ_BUF_SIZE)
			m_in_buf.Extend(READ_BUF_SIZE);

		int ret = netlib_recv(m_handle, m_in_buf.GetBuffer() + m_in_buf.GetWriteOffset(), READ_BUF_SIZE);
		if (ret <= 0)
			break;

		m_recv_bytes += ret;
		m_in_buf.IncWriteOffset(ret);
		m_last_recv_tick = get_tick_count();
	}

	uint32_t pdu_len = 0;
    try {
        while ( CImPdu::IsPduAvailable(m_in_buf.GetBuffer(), m_in_buf.GetWriteOffset(), pdu_len) ) {
            HandlePduBuf(m_in_buf.GetBuffer(), pdu_len);
            m_in_buf.Read(NULL, pdu_len);
        }
    } catch (CPduException& ex) {
        log("!!!catch exception, err_code=%u, err_msg=%s, close the connection ",
            ex.GetErrorCode(), ex.GetErrorMsg());
        OnClose();
    }

}
2
3
4
5
6
7
8
9
10
11
12
13
14
15
16
17
18
19
20
21
22
23
24
25
26
27
28
29
CImConn实际是代表一个连接,即每一个连接都有这样一个对象。具体被分化成它的各个子对象,如CProxyConn。每一个连接CImConn都存在一个读缓冲区和写缓冲区,读缓冲区用于存放从网络上收取的数据,写缓冲区用于存放即将发到网络中数据。CProxyConn::OnRead()先检测该对象的读缓冲区中还有多少可用空间,如果可用空间小于当前收到的字节数目,则将该读缓冲区的大小扩展到需要的大小READ_BUF_SIZE。接着收到的数据放入读缓冲区中。并记录下这次收取数据的时间到m_last_recv_tick变量中。接着开始解包,即调用CImPdu::IsPduAvailable()从读取缓冲区中取出数据处理,先判断现有数据是否大于一个包头的大小,如果不大于,退出。如果大于一个包头的大小,则接着根据包头中的信息得到整个包的大小:
bool CImPdu::IsPduAvailable(uchar_t* buf, uint32_t len, uint32_t& pdu_len)
{
	if (len < IM_PDU_HEADER_LEN)
		return false;

	pdu_len = CByteStream::ReadUint32(buf);
	if (pdu_len > len)
	{
		//log("pdu_len=%d, len=%d\n", pdu_len, len);
		return false;
	}

    if(0 == pdu_len)
    {
        throw CPduException(1, "pdu_len is 0");
    }

	return true;
}
2
3
4
5
6
7
8
9
10
11
12
13
14
15
16
17
18
19
得到包的大小就可以正式处理包了,调用HandlePduBuf(m_in_buf.GetBuffer(), pdu_len);
void CProxyConn::HandlePduBuf(uchar_t* pdu_buf, uint32_t pdu_len)
{
    CImPdu* pPdu = NULL;
    pPdu = CImPdu::ReadPdu(pdu_buf, pdu_len);
    if (pPdu->GetCommandId() == IM::BaseDefine::CID_OTHER_HEARTBEAT) {
        return;
    }

    pdu_handler_t handler = s_handler_map->GetHandler(pPdu->GetCommandId());

    if (handler) {
        CTask* pTask = new CProxyTask(m_uuid, handler, pPdu);
        g_thread_pool.AddTask(pTask);
    } else {
        log("no handler for packet type: %d", pPdu->GetCommandId());
    }
}
2
3
4
5
6
7
8
9
10
11
12
13
14
15
16
17
包的数据结构是CImPdu(Im 即Instant Message即时通讯软件的意思,teamtalk本来就是一款即时通讯,pdu,Protocol Data Unit 协议数据单元,通俗的说就是一个包单位),该数据结构分为包头和包体两部分。类CImPdu的两个成员变量:
CSimpleBuffer	m_buf;
PduHeader_t      m_pdu_header;
2
分别表示包头和包体,包头的定义PduHeader_t如下:
typedef struct {
    uint32_t 	length;		  // the whole pdu length
    uint16_t 	version;	  // pdu version number
    uint16_t	flag;		  // not used
    uint16_t	service_id;	  //
    uint16_t	command_id;	  //
    uint16_t	seq_num;     // 包序号
    uint16_t    reversed;    // 保留
} PduHeader_t;
2
3
4
5
6
7
8
9
通过包头的command_id就知道该包是什么数据了。接着根据对应的命令号调用在程序初始化阶段绑定的包处理函数:
pdu_handler_t handler = s_handler_map->GetHandler(pPdu->GetCommandId());
执行处理函数不是直接调用该函数,而是包装成一个任务放入前面介绍的任务队列中:
du_handler_t handler = s_handler_map->GetHandler(pPdu->GetCommandId());

    if (handler) {
        CTask* pTask = new CProxyTask(m_uuid, handler, pPdu);
        g_thread_pool.AddTask(pTask);
    } else {
        log("no handler for packet type: %d", pPdu->GetCommandId());
    }
2
3
4
5
6
7
8
前面介绍过,处理任务的线程可能有多个,那么到底将任务加入到哪个工作线程呢?这里采取的策略是随机分配:
void CThreadPool::AddTask(CTask* pTask)
{
	/*
	 * select a random thread to push task
	 * we can also select a thread that has less task to do
	 * but that will scan the whole thread list and use thread lock to get each task size
	 */
	uint32_t thread_idx = random() % m_worker_size;
	m_worker_list[thread_idx].PushTask(pTask);
}
2
3
4
5
6
7
8
9
10
当然需要注意的是。如果数据包是心跳包的话,就直接不处理了。因为心跳包只是来保活通信的,与具体业务无关:
if (pPdu->GetCommandId() == IM::BaseDefine::CID_OTHER_HEARTBEAT) {
        return;
    }
2
3
该包处理完成以后,将该包的数据从连接的读缓冲区移除:
m_in_buf.Read(NULL, pdu_len);
接着继续处理下一个包,因为收来的数据可能不够一个包大小,也可能是多个包的大小,所以要放在一个循环里面解包处理,直到读缓冲区中无数据或数据不够一个包的大小。
我们将这个流程抽象出来,这个流程也是现在所有网络通信库都要做的工作:
while(退出条件)
{
	//1. 检测非侦听socket可读

	//2. 处理可读事件

	//3. 检测可读取的字节数,出错就关闭,不出错,将收取的字节放入连接的读缓冲区

	//循环做以下处理
	//4. 检测可读缓冲区数据大小是否大于等于一个包头大小: 否,数据不够一个包,跳出该循环;
	//	  是,从包头中得到一个包体的大小,检测读缓冲区是否够一个包头+包体的大小;否,数据不够一个包,跳出循环
	//	  是,解包,根据包命令号,处理该包数据,可以产生一个任务,丢入任务队列。
	//	  从可读缓冲区中移除刚才处理的包数据的字节数目。
	//	  继续第4步。
}
2
3
4
5
6
7
8
9
10
11
12
13
14
15
当加入任务后,任务队列线程被唤醒,从任务队列的头部拿出该任务执行。这个上文介绍过了。
到此,本文还没有完,因为上文只介绍了从客户端收取数据,然后解包。并没有介绍解完包,调用处理函数处理后如何应答客户端。下面以一个登录数据包的应答来叙述这个应答流程。登录任务从任务队列中取出来后,执行如下函数:
void CHandlerMap::Init()
{
    //DB_PROXY是命名空间,不是类名
	// Login validate
	m_handler_map.insert(make_pair(uint32_t(CID_OTHER_VALIDATE_REQ), DB_PROXY::doLogin));
2
3
4
5
void doLogin(CImPdu* pPdu, uint32_t conn_uuid)
{

    CImPdu* pPduResp = new CImPdu;

    IM::Server::IMValidateReq msg;
    IM::Server::IMValidateRsp msgResp;
    if(msg.ParseFromArray(pPdu->GetBodyData(), pPdu->GetBodyLength()))
    {

        string strDomain = msg.user_name();
        string strPass = msg.password();

        msgResp.set_user_name(strDomain);
        msgResp.set_attach_data(msg.attach_data());

        do
        {
            CAutoLock cAutoLock(&g_cLimitLock);
            list<uint32_t>& lsErrorTime = g_hmLimits[strDomain];
            uint32_t tmNow = time(NULL);

            //清理超过30分钟的错误时间点记录
            /*
             清理放在这里还是放在密码错误后添加的时候呢?
             放在这里,每次都要遍历,会有一点点性能的损失。
             放在后面,可能会造成30分钟之前有10次错的,但是本次是对的就没办法再访问了。
             */
            auto itTime=lsErrorTime.begin();
            for(; itTime!=lsErrorTime.end();++itTime)
            {
                if(tmNow - *itTime > 30*60)
                {
                    break;
                }
            }
            if(itTime != lsErrorTime.end())
            {
                lsErrorTime.erase(itTime, lsErrorTime.end());
            }

            // 判断30分钟内密码错误次数是否大于10
            if(lsErrorTime.size() > 10)
            {
                itTime = lsErrorTime.begin();
                if(tmNow - *itTime <= 30*60)
                {
                    msgResp.set_result_code(6);
                    msgResp.set_result_string("用户名/密码错误次数太多");
                    pPduResp->SetPBMsg(&msgResp);
                    pPduResp->SetSeqNum(pPdu->GetSeqNum());
                    pPduResp->SetServiceId(IM::BaseDefine::SID_OTHER);
                    pPduResp->SetCommandId(IM::BaseDefine::CID_OTHER_VALIDATE_RSP);
                    CProxyConn::AddResponsePdu(conn_uuid, pPduResp);
                    return ;
                }
            }
        } while(false);

        log("%s request login.", strDomain.c_str());


        IM::BaseDefine::UserInfo cUser;

        if(g_loginStrategy.doLogin(strDomain, strPass, cUser))
        {
            IM::BaseDefine::UserInfo* pUser = msgResp.mutable_user_info();
            pUser->set_user_id(cUser.user_id());
            pUser->set_user_gender(cUser.user_gender());
            pUser->set_department_id(cUser.department_id());
            pUser->set_user_nick_name(cUser.user_nick_name());
            pUser->set_user_domain(cUser.user_domain());
            pUser->set_avatar_url(cUser.avatar_url());

            pUser->set_email(cUser.email());
            pUser->set_user_tel(cUser.user_tel());
            pUser->set_user_real_name(cUser.user_real_name());
            pUser->set_status(0);

            pUser->set_sign_info(cUser.sign_info());

            msgResp.set_result_code(0);
            msgResp.set_result_string("成功");

            //如果登陆成功,则清除错误尝试限制
            CAutoLock cAutoLock(&g_cLimitLock);
            list<uint32_t>& lsErrorTime = g_hmLimits[strDomain];
            lsErrorTime.clear();
        }
        else
        {
            //密码错误,记录一次登陆失败
            uint32_t tmCurrent = time(NULL);
            CAutoLock cAutoLock(&g_cLimitLock);
            list<uint32_t>& lsErrorTime = g_hmLimits[strDomain];
            lsErrorTime.push_front(tmCurrent);

            log("get result false");
            msgResp.set_result_code(1);
            msgResp.set_result_string("用户名/密码错误");
        }
    }
    else
    {
        msgResp.set_result_code(2);
        msgResp.set_result_string("服务端内部错误");
    }


    pPduResp->SetPBMsg(&msgResp);
    pPduResp->SetSeqNum(pPdu->GetSeqNum());
    pPduResp->SetServiceId(IM::BaseDefine::SID_OTHER);
    pPduResp->SetCommandId(IM::BaseDefine::CID_OTHER_VALIDATE_RSP);
    CProxyConn::AddResponsePdu(conn_uuid, pPduResp);
}
2
3
4
5
6
7
8
9
10
11
12
13
14
15
16
17
18
19
20
21
22
23
24
25
26
27
28
29
30
31
32
33
34
35
36
37
38
39
40
41
42
43
44
45
46
47
48
49
50
51
52
53
54
55
56
57
58
59
60
61
62
63
64
65
66
67
68
69
70
71
72
73
74
75
76
77
78
79
80
81
82
83
84
85
86
87
88
89
90
91
92
93
94
95
96
97
98
99
100
101
102
103
104
105
106
107
108
109
110
111
112
113
114
115
116
这段代码有点复杂,下面分析之:
首先,将登录请求包数据通过函数参数(第一个参数)传入进来,其次是连接对象的id。前面已经介绍过了,每一个新的socket不仅对应一个CBaseSocket对象,同时也对应一个连接对象CImConn(可能会被具体化成对应的子类,如CProxyConn)。这些连接对象被放在另外一个全局map g_proxy_conn_map里面进行管理。
通过包数据,我们能得到登录的用户名和密码等信息。接着检测30分钟之内,尝试登录的次数,如果30分钟之内密码错误次数超过10此。则不允许登录。组成一个提示“用户名或密码错误此时太多”的包:
msgResp.set_result_code(6);
msgResp.set_result_string("用户名/密码错误次数太多");
pPduResp->SetPBMsg(&msgResp);
pPduResp->SetSeqNum(pPdu->GetSeqNum());
pPduResp->SetServiceId(IM::BaseDefine::SID_OTHER);
pPduResp->SetCommandId(IM::BaseDefine::CID_OTHER_VALIDATE_RSP);
CProxyConn::AddResponsePdu(conn_uuid, pPduResp);
2
3
4
5
6
7
如果不存在这种情况,则接着调用g_loginStrategy.doLogin(strDomain, strPass, cUser)连接数据库进行用户名和密码校验:
bool CInterLoginStrategy::doLogin(const std::string &strName, const std::string &strPass, IM::BaseDefine::UserInfo& user)
{
    bool bRet = false;
    CDBManager* pDBManger = CDBManager::getInstance();
    CDBConn* pDBConn = pDBManger->GetDBConn("teamtalk_slave");
    if (pDBConn) {
        string strSql = "select * from IMUser where name='" + strName + "' and status=0";
        CResultSet* pResultSet = pDBConn->ExecuteQuery(strSql.c_str());
        if(pResultSet)
        {
            string strResult, strSalt;
            uint32_t nId, nGender, nDeptId, nStatus;
            string strNick, strAvatar, strEmail, strRealName, strTel, strDomain,strSignInfo;
            while (pResultSet->Next()) {
                nId = pResultSet->GetInt("id");
                strResult = pResultSet->GetString("password");
                strSalt = pResultSet->GetString("salt");

                strNick = pResultSet->GetString("nick");
                nGender = pResultSet->GetInt("sex");
                strRealName = pResultSet->GetString("name");
                strDomain = pResultSet->GetString("domain");
                strTel = pResultSet->GetString("phone");
                strEmail = pResultSet->GetString("email");
                strAvatar = pResultSet->GetString("avatar");
                nDeptId = pResultSet->GetInt("departId");
                nStatus = pResultSet->GetInt("status");
                strSignInfo = pResultSet->GetString("sign_info");

            }

            string strInPass = strPass + strSalt;
            char szMd5[33];
            CMd5::MD5_Calculate(strInPass.c_str(), strInPass.length(), szMd5);
            string strOutPass(szMd5);
            //去掉密码校验
            //if(strOutPass == strResult)
            {
                bRet = true;
                user.set_user_id(nId);
                user.set_user_nick_name(strNick);
                user.set_user_gender(nGender);
                user.set_user_real_name(strRealName);
                user.set_user_domain(strDomain);
                user.set_user_tel(strTel);
                user.set_email(strEmail);
                user.set_avatar_url(strAvatar);
                user.set_department_id(nDeptId);
                user.set_status(nStatus);
  	        user.set_sign_info(strSignInfo);

            }
            delete  pResultSet;
        }
        pDBManger->RelDBConn(pDBConn);
    }
    return bRet;
}
2
3
4
5
6
7
8
9
10
11
12
13
14
15
16
17
18
19
20
21
22
23
24
25
26
27
28
29
30
31
32
33
34
35
36
37
38
39
40
41
42
43
44
45
46
47
48
49
50
51
52
53
54
55
56
57
58
这里也需要一个mysql连接,这个连接的分配方式在前面介绍过了。即在连接池中随机拿一个,如果池中不存在,则新建一个。用完还回去:
pDBManger->RelDBConn(pDBConn);
接着通过用户名从数据库中取出该用户信息,如果记录存在,则接着校验密码。密码在数据库里面的存储形式是:密码+用户的salt值 组成的字符串的md5值。密码如果也校验正确,组装成一个正确应答数据包(附上命令号、序列号、提示信息等):
pPduResp->SetPBMsg(&msgResp);
    pPduResp->SetSeqNum(pPdu->GetSeqNum());
    pPduResp->SetServiceId(IM::BaseDefine::SID_OTHER);
    pPduResp->SetCommandId(IM::BaseDefine::CID_OTHER_VALIDATE_RSP);
    CProxyConn::AddResponsePdu(conn_uuid, pPduResp);
2
3
4
5
现在不管登录成功与否,登录应答包也已经组装好了。接下来,就是如何发出去了?上述代码最后一行:
CProxyConn::AddResponsePdu(conn_uuid, pPduResp)
其调用如下:
void CProxyConn::AddResponsePdu(uint32_t conn_uuid, CImPdu* pPdu)
{
	ResponsePdu_t* pResp = new ResponsePdu_t;
	pResp->conn_uuid = conn_uuid;
	pResp->pPdu = pPdu;

	s_list_lock.lock();
	s_response_pdu_list.push_back(pResp);
	s_list_lock.unlock();
}
2
3
4
5
6
7
8
9
10
我们这里并没有直接将应答数据包通过连接对象CProxyConn发出去。因为直接发出去,未必能发出去。这会导致程序阻塞。(原因是:对方的tcp窗口太小,导致tcp窗口太小的常见原因是:对方无法收包或不及时收包,数据积压在对方网络协议栈里面)。我们这里是将应答数据包放入连接对象的一个应答链表s_response_pdu_list中。这是一个stl list容器:
static list<ResponsePdu_t*> s_response_pdu_list; // 主线程发送回复消息
那么,包在这个链表中,何时被发出去呢?我们在介绍该服务的消息泵时介绍到如下流程:
while(退出条件)
{
	//1. 遍历定时器队列,检测是否有定时器事件到期,有则执行定时器的回调函数

	//2. 遍历其他任务队列,检测是否有其他任务需要执行,有,执行之

	//3. 检测socket集合,分离可读、可写和异常事件

	//4. 处理socket可读事件

	//5. 处理socket可写事件

	//6. 处理socket异常事件
}
2
3
4
5
6
7
8
9
10
11
12
13
14
注意第2步:遍历其他任务队列,检测是否有其他任务需要执行,有,执行之。我们来看看这步具体做了什么。
在main函数里面初始化任务队列线程时,同时也创建了一个其他任务:
init_proxy_conn(thread_num);
int init_proxy_conn(uint32_t thread_num)
{
	s_handler_map = CHandlerMap::getInstance();
	g_thread_pool.Init(thread_num);

	netlib_add_loop(proxy_loop_callback, NULL);

	signal(SIGTERM, sig_handler);

	return netlib_register_timer(proxy_timer_callback, NULL, 1000);
}
2
3
4
5
6
7
8
9
10
11
注意代码netlib_add_loop(proxy_loop_callback, NULL);该行加入了一个其他任务到其他任务队列。这样在主线程的消息泵中:2. 遍历其他任务队列,检测是否有其他任务需要执行,有,执行之。
_CheckLoop();
void CEventDispatch::_CheckLoop()
{
    for (list<TimerItem*>::iterator it = m_loop_list.begin(); it != m_loop_list.end(); it++) {
        TimerItem* pItem = *it;
        pItem->callback(pItem->user_data, NETLIB_MSG_LOOP, 0, NULL);
    }
}
2
3
4
5
6
7
其他任务的回调函数目前只有一个,就是上面设置的proxy_loop_callback:
void proxy_loop_callback(void* callback_data, uint8_t msg, uint32_t handle, void* pParam)
{
	CProxyConn::SendResponsePduList();
}
2
3
4
void CProxyConn::SendResponsePduList()
{
	s_list_lock.lock();
	while (!s_response_pdu_list.empty()) {
		ResponsePdu_t* pResp = s_response_pdu_list.front();
		s_response_pdu_list.pop_front();
		s_list_lock.unlock();

		CProxyConn* pConn = get_proxy_conn_by_uuid(pResp->conn_uuid);
		if (pConn) {
			if (pResp->pPdu) {
				pConn->SendPdu(pResp->pPdu);
			} else {
				log("close connection uuid=%d by parse pdu error\b", pResp->conn_uuid);
				pConn->Close();
			}
		}

		if (pResp->pPdu)
			delete pResp->pPdu;
		delete pResp;

		s_list_lock.lock();
	}

	s_list_lock.unlock();
}
2
3
4
5
6
7
8
9
10
11
12
13
14
15
16
17
18
19
20
21
22
23
24
25
26
27
看到这里,你应该明白了。原来应答数据包在这里从list中取出来。然后调用pConn->SendPdu(pResp->pPdu)“发出去”。这里需要解释两个问题:第一个就是一般服务器端会有多个连接对象,那么如何定位某个应答数据包对应的连接对象呢?这里就通过数据包本身的conn_uuid来确定:
CProxyConn* pConn = get_proxy_conn_by_uuid(pResp->conn_uuid);
CProxyConn* get_proxy_conn_by_uuid(uint32_t uuid)
{
	CProxyConn* pConn = NULL;
	UserMap_t::iterator it = g_uuid_conn_map.find(uuid);
	if (it != g_uuid_conn_map.end()) {
		pConn = (CProxyConn *)it->second;
	}

	return pConn;
}
2
3
4
5
6
7
8
9
10
全局对象g_uuid_conn_map里面存的是uuid与连接对象的对应关系。这个关系何时存入到这个全局g_uuid_conn_map对象的呢?在CProxyConn的构造函数中:
CProxyConn::CProxyConn()
{
	m_uuid = ++CProxyConn::s_uuid_alloctor;
	if (m_uuid == 0) {
		m_uuid = ++CProxyConn::s_uuid_alloctor;
	}

	g_uuid_conn_map.insert(make_pair(m_uuid, this));
}
2
3
4
5
6
7
8
9
这个uuid的基数是一个CProxyConn的静态变量:
static uint32_t s_uuid_alloctor;
默认是0:
uint32_t CProxyConn::s_uuid_alloctor = 0;
以后每产生一个新连接对象CProxyConn,在此基础上递增,因为没有用锁保护,所以只能在一个线程里面调用。而CProxyConn正好就是在主线程里面产生的,前面介绍过了,再次贴一下代码吧:
void proxy_serv_callback(void* callback_data, uint8_t msg, uint32_t handle, void* pParam)
{
    if (msg == NETLIB_MSG_CONNECT)
    {
        CProxyConn* pConn = new CProxyConn();
        pConn->OnConnect(handle);
    }
    else
    {
        log("!!!error msg: %d", msg);
    }
}
2
3
4
5
6
7
8
9
10
11
12
这样uuid和连接对象CProxyConn还有CBaseSocket这三者的关系就唯一绑定了。
接着说,通过uuid获得对应数据包的连接对象后,调用其方法pConn->SendPdu(pResp->pPdu); “发出去”?但是,还是不行,因为这还没有解决上文提出的该连接上对端的tcp窗口太小导致数据发不出的问题。所以pConn->SendPdu()方法中一定不是调用send函数直接发送数据:
int SendPdu(CImPdu* pPdu) { return Send(pPdu->GetBuffer(), pPdu->GetLength()); }
实际上是调用其基类CImConn类的Send方法,发送数据的时候,先记录一下发送数据的时间:m_last_send_tick = get_tick_count();
int CImConn::Send(void* data, int len)
{
    m_last_send_tick = get_tick_count();
    //	++g_send_pkt_cnt;

    if (m_busy)
    {
        m_out_buf.Write(data, len);
        return len;
    }

    int offset = 0;
    int remain = len;
    while (remain > 0) {
        int send_size = remain;
        if (send_size > NETLIB_MAX_SOCKET_BUF_SIZE) {
            send_size = NETLIB_MAX_SOCKET_BUF_SIZE;
        }

        int ret = netlib_send(m_handle, (char*)data + offset, send_size);
        if (ret <= 0) {
            ret = 0;
            break;
        }

        offset += ret;
        remain -= ret;
    }

    if (remain > 0)
    {
        m_out_buf.Write((char*)data + offset, remain);
        m_busy = true;
        log("send busy, remain=%d ", m_out_buf.GetWriteOffset());
    }
    else
    {
        OnWriteCompelete();
    }

    return len;
}
2
3
4
5
6
7
8
9
10
11
12
13
14
15
16
17
18
19
20
21
22
23
24
25
26
27
28
29
30
31
32
33
34
35
36
37
38
39
40
41
42
注意这段代码,也是特别的讲究:
先试着调用底层send方法去发送,能发多少是多少,剩下发不完的,写入该连接的发送缓冲区中,并将忙碌标志m_busy置位(设置为ture)。反之,如果数据一次性发送完成,则调用数据发送完成函数OnWriteComplete(),这个函数目前为空,即不做任何事情。
int ret = netlib_send(m_handle, (char*)data + offset , send_size);
int netlib_send(net_handle_t handle, void* buf, int len)
{
	CBaseSocket* pSocket = FindBaseSocket(handle);
	if (!pSocket)
	{
		return NETLIB_ERROR;
	}
	int ret = pSocket->Send(buf, len);
	pSocket->ReleaseRef();
	return ret;
}
2
3
4
5
6
7
8
9
10
11
上面的代码通过socket句柄找到具体的CBaseSocket对象。接着调用CBaseSocket::Send()方法:
int CBaseSocket::Send(void* buf, int len)
{
	if (m_state != SOCKET_STATE_CONNECTED)
		return NETLIB_ERROR;

	int ret = send(m_socket, (char*)buf, len, 0);
	if (ret == SOCKET_ERROR)
	{
		int err_code = _GetErrorCode();
		if (_IsBlock(err_code))
		{
#if ((defined _WIN32) || (defined __APPLE__))
			CEventDispatch::Instance()->AddEvent(m_socket, SOCKET_WRITE);
#endif
			ret = 0;
			//log("socket send block fd=%d", m_socket);
		}
		else
		{
			log("!!!send failed, error code: %d", err_code);
		}
	}

	return ret;
}
2
3
4
5
6
7
8
9
10
11
12
13
14
15
16
17
18
19
20
21
22
23
24
25
该方法发送指定长度的数据,因为socket在创建的时候被设置成非阻塞的(上文介绍过)。所以,如果发送不了,底层send函数会立刻返回,并返回错误码EINPROGRESS(EWOULDBLOCK),表明对端tcp窗口太小,当前已经无法发出去:
bool CBaseSocket::_IsBlock(int error_code)
{
#ifdef _WIN32
	return ( (error_code == WSAEINPROGRESS) || (error_code == WSAEWOULDBLOCK) );
#else
	return ( (error_code == EINPROGRESS) || (error_code == EWOULDBLOCK) );
#endif
}
2
3
4
5
6
7
8
这个时候,我们再设置关注该socket的可写事件。这样,下次对端tcp窗口大小增大时,本端的socket可写时,我们就能接着发送数据了。会在服务的消息泵中检测可写事件,接着调用CBaseSocket::OnWrite(), 该函数首先移除该socket的可写事件(这里为啥只有win32平台和mac机器移除可写事件,linux平台不需要吗?个人觉得是程序作者的疏忽)。
void CBaseSocket::OnWrite()
{
#if ((defined _WIN32) || (defined __APPLE__))
	CEventDispatch::Instance()->RemoveEvent(m_socket, SOCKET_WRITE);
#endif

	if (m_state == SOCKET_STATE_CONNECTING)
	{
		int error = 0;
		socklen_t len = sizeof(error);
#ifdef _WIN32

		getsockopt(m_socket, SOL_SOCKET, SO_ERROR, (char*)&error, &len);
#else
		getsockopt(m_socket, SOL_SOCKET, SO_ERROR, (void*)&error, &len);
#endif
		if (error) {
			m_callback(m_callback_data, NETLIB_MSG_CLOSE, (net_handle_t)m_socket, NULL);
		} else {
			m_state = SOCKET_STATE_CONNECTED;
			m_callback(m_callback_data, NETLIB_MSG_CONFIRM, (net_handle_t)m_socket, NULL);
		}
	}
	else
	{
		m_callback(m_callback_data, NETLIB_MSG_WRITE, (net_handle_t)m_socket, NULL);
	}
}
2
3
4
5
6
7
8
9
10
11
12
13
14
15
16
17
18
19
20
21
22
23
24
25
26
27
28
走else分支,调用设置的回调函数imconn_callback:
void imconn_callback(void* callback_data, uint8_t msg, uint32_t handle, void* pParam)
{
	NOTUSED_ARG(handle);
	NOTUSED_ARG(pParam);

	if (!callback_data)
		return;

	ConnMap_t* conn_map = (ConnMap_t*)callback_data;
	CImConn* pConn = FindImConn(conn_map, handle);
	if (!pConn)
		return;

	//log("msg=%d, handle=%d ", msg, handle);

	switch (msg)
	{
	case NETLIB_MSG_CONFIRM:
		pConn->OnConfirm();
		break;
	case NETLIB_MSG_READ:
		pConn->OnRead();
		break;
	case NETLIB_MSG_WRITE:
		pConn->OnWrite();
		break;
	case NETLIB_MSG_CLOSE:
		pConn->OnClose();
		break;
	default:
		log("!!!imconn_callback error msg: %d ", msg);
		break;
	}

	pConn->ReleaseRef();
}
2
3
4
5
6
7
8
9
10
11
12
13
14
15
16
17
18
19
20
21
22
23
24
25
26
27
28
29
30
31
32
33
34
35
36
因为这次传入的消息是NETLIB_MSG_WRITE,所以走pConn->OnWrite分支,接着由于多态调用CImConn的子类CProxyConn的OnWrite()函数,但由于子类CProxyConn并没有改写OnWrite()方法,所以调用CImConn的OnWrite():
void CImConn::OnWrite()
{
	if (!m_busy)
		return;

	while (m_out_buf.GetWriteOffset() > 0) {
		int send_size = m_out_buf.GetWriteOffset();
		if (send_size > NETLIB_MAX_SOCKET_BUF_SIZE) {
			send_size = NETLIB_MAX_SOCKET_BUF_SIZE;
		}

		int ret = netlib_send(m_handle, m_out_buf.GetBuffer(), send_size);
		if (ret <= 0) {
			ret = 0;
			break;
		}

		m_out_buf.Read(NULL, ret);
	}

	if (m_out_buf.GetWriteOffset() == 0) {
		m_busy = false;
	}

	log("onWrite, remain=%d ", m_out_buf.GetWriteOffset());
}
2
3
4
5
6
7
8
9
10
11
12
13
14
15
16
17
18
19
20
21
22
23
24
25
26
接着继续从写缓冲区取出数据继续发送,如果还是只能发送出去,继续监听该socket可写事件,每次发送出去多少,就从写缓冲区中移除该部分字节。如果全部发送完了。将忙碌标志m_busy清零(false)。
至此,应答数据包的流程也介绍完了。我们来总结下该流程:
//1. 主消息泵检测到有其他任务需要做,做之。

//2. 该任务是从全局的链表中取出应答包数据,找到对应的连接对象,然后尝试直接发出去;

//3. 如果发不出,则将该数据存入该连接的发送缓冲区(写缓冲区),并监听该连接的socket可写事件。

//4. 下次该socket触发可写事件时,接着发送该连接的写缓冲区中剩余的数据。如此循环直到所有数据都发送成功。

//5. 取消监听该socket可写事件,以避免无数据的情况下触发写事件(该事件大多数情况下很频繁)
2
3
4
5
6
7
8
9
上面的流程从第2步到第5步也是主流网络库的发数据的逻辑。总而言之,就是说,先试着发送数据,如果发不出去,存起来,监听可写事件,下次触发可写事件后接着发。一直到数据全部发出去后,移除监听可写事件。通常只要可写事件是不断会触发的,所以默认不监听可写事件,只有数据发不出的时候才会监听可写事件。这个原则,千万要记住。
最后一个问题,是关于心跳包的,即db_proxy_server是如何发送心跳包的:
程序初始化的时候,注册一个定时器函数:
init_proxy_conn(thread_num);
int init_proxy_conn(uint32_t thread_num)
{
	s_handler_map = CHandlerMap::getInstance();
	g_thread_pool.Init(thread_num);

	netlib_add_loop(proxy_loop_callback, NULL);

	signal(SIGTERM, sig_handler);

	return netlib_register_timer(proxy_timer_callback, NULL, 1000);
}
2
3
4
5
6
7
8
9
10
11
最后一行:return netlib_register_timer(proxy_timer_callback, NULL, 1000);
然后在消息泵里面检测定时器:
_CheckTimer();
void CEventDispatch::_CheckTimer()
{
	uint64_t curr_tick = get_tick_count();
	list<TimerItem*>::iterator it;

	for (it = m_timer_list.begin(); it != m_timer_list.end(); )
	{
		TimerItem* pItem = *it;
		it++;		// iterator maybe deleted in the callback, so we should increment it before callback
		if (curr_tick >= pItem->next_tick)
		{
			pItem->next_tick += pItem->interval;
			pItem->callback(pItem->user_data, NETLIB_MSG_TIMER, 0, NULL);
		}
	}
}
2
3
4
5
6
7
8
9
10
11
12
13
14
15
16
uint64_t get_tick_count()
{
#ifdef _WIN32
	LARGE_INTEGER liCounter;
	LARGE_INTEGER liCurrent;

	if (!QueryPerformanceFrequency(&liCounter))
		return GetTickCount();

	QueryPerformanceCounter(&liCurrent);
	return (uint64_t)(liCurrent.QuadPart * 1000 / liCounter.QuadPart);
#else
	struct timeval tval;
	uint64_t ret_tick;

	gettimeofday(&tval, NULL);

	ret_tick = tval.tv_sec * 1000L + tval.tv_usec / 1000L;
	return ret_tick;
#endif
}
2
3
4
5
6
7
8
9
10
11
12
13
14
15
16
17
18
19
20
21
由上面的函数可以看出来定时器的单位是毫秒,当定时器时间到了后,调用回调函数proxy_timer_callback:
void proxy_timer_callback(void* callback_data, uint8_t msg, uint32_t handle, void* pParam)
{
	uint64_t cur_time = get_tick_count();
	for (ConnMap_t::iterator it = g_proxy_conn_map.begin(); it != g_proxy_conn_map.end(); ) {
		ConnMap_t::iterator it_old = it;
		it++;

		CProxyConn* pConn = (CProxyConn*)it_old->second;
		pConn->OnTimer(cur_time);
	}
}
2
3
4
5
6
7
8
9
10
11
void CProxyConn::OnTimer(uint64_t curr_tick)
{
	if (curr_tick > m_last_send_tick + SERVER_HEARTBEAT_INTERVAL) {

        CImPdu cPdu;
        IM::Other::IMHeartBeat msg;
        cPdu.SetPBMsg(&msg);
        cPdu.SetServiceId(IM::BaseDefine::SID_OTHER);
        cPdu.SetCommandId(IM::BaseDefine::CID_OTHER_HEARTBEAT);
		SendPdu(&cPdu);
	}

	if (curr_tick > m_last_recv_tick + SERVER_TIMEOUT) {
		log("proxy connection timeout %s:%d", m_peer_ip.c_str(), m_peer_port);
		Close();
	}
}
2
3
4
5
6
7
8
9
10
11
12
13
14
15
16
17
m_last_send_tick是上一次发送数据的时间,我们上文中介绍过,如果当前时间距上一次发送数据的时间已经超过了指定的时间间隔,则发送一个心跳包(这里的时间间隔是5000毫秒)。
m_last_recv_tick是上一次收取数据的时间,我们上文也介绍过,如果当前时间举例上一次接收时间已经超过了指定的时间间隔(相当于一段时间内,对端没有给当前服务发送任何数据),这个时候就关闭该连接(这里设置的时间间隔是30000毫秒,也就是30秒)。
这种心跳包机制特别值得推崇,也是常见的心跳包策略。
至此,db_proxy_server的框架和原理也就介绍完了。剩下的就是一些业务逻辑了。如果你感兴趣,可以自己查看对应的命令号绑定的处理函数的处理流程。
文中如果有说错的地方,欢迎提出留言指正。
# TeamTalk 学习帮助/技术交流群:
如果你在学习或者部署 TeamTalk 的过程中遇到任何技术问题,可以加小方的 TeamTalk技术交流群 获取帮助,加小方微信:cppxiaofang,加微信请备注“进TeamTalk群”。